
Scene Time Functions
In addition to triggering Scenes manually from the Master Tile or Main Screen (as described in the Automation Overview), they can also be triggered using time functions.
Scenes can be triggered automatically when the console's timecode reaches a specific value.
To set a trigger time for a Scene:
Touch the timecode display in the Trigger Time column for the required Scene. The Trigger Time configuration page will open in the bottom half of the screen.
Note: To navigate from a different Configuration page, touch the Trigger Time button in the left of the screen.Insert the required timecode into the Time clock readout by touching each field's up and down arrows to increment and decrement them.
You can also clear the time to 0 by touching Clear Time, or insert the current timecode value by touching Capture.
Now touch Apply, and the timecode value will appear in the Scene's Trigger Time column.
Finally, the Trigger Time needs to be Armed by touching Arm. A green 'light' in the top left corner of the Scene's Trigger Time entry indicates that it is active.
If the One Shot button is activated, the Scene will be triggered next time its timecode is reached, but will then disarm to prevent further timecode triggering.
The Trigger Time function column can be globally disabled by touching the column title – it will go red and the column contents will become greyed out, indicating that the column is inactive. All Scenes with Trigger Times will now not be triggered when their timecode is reached.
Fade Time
The Fade Time field in the scene list displays how long the complete fade into the Scene will take. Because fades are defined for each element, this number is not editable.
To change the fade time for the elements of the Scene:
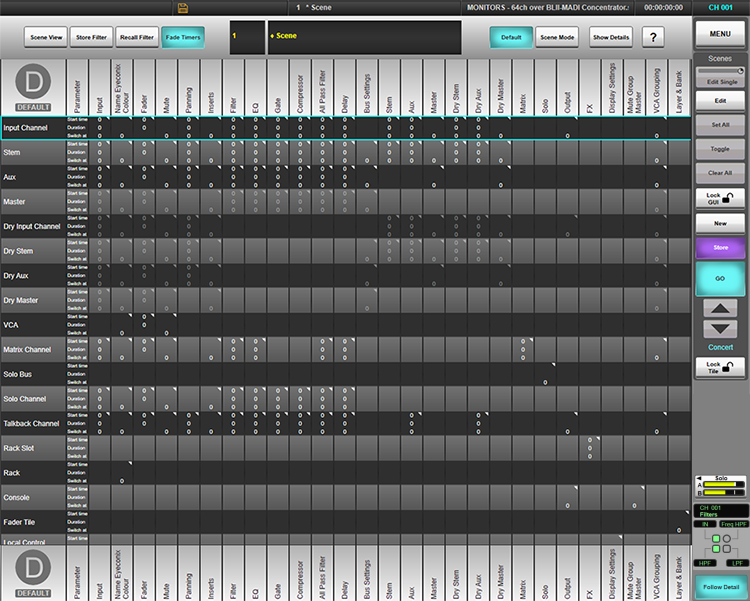
Select the Scene and touch the Fade Timers button at the top of the automation page. A fade timers grid will appear, with path types listed as rows in the grid and individual path elements listed as columns, similar to the below:
Select Default or Scene Mode at the top of the screen to edit the default fade times for new scenes or fade times for the currently selected scene respectively.
Note: Default Fade Times are only applied to new Scenes; they do not affect fade timers for existing Scenes, including the currently selected one.Enable the Edit button on the right of the screen.
If in Scene Mode, changes can be made to the Selected scene only, all scenes within the same Group (see Scene Groups) or all scenes by changing the edit range mode; Press & hold the button located just above the Edit button and choose Edit Single (default), Edit Group or Edit All. Subsequent Fade Time changes will now be applied to the defined range of scenes.
To see individual paths, select the path type row (e.g. Input Channel) and use the Show Details button at the top of the screen to open a detailed list of paths.
Double-tap a time field to open up a display of that element's timings; there are three times:
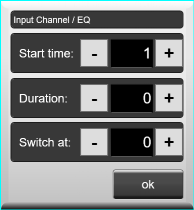
Start time: The delay between the scene fire and the start of the fade.
Duration: The length of time the fade then takes.
Switch At: The delay between the scene fire and when the switches change their status.
Tap on the ? button in the top right of the screen to view these definitions on the console.
Use the - and + buttons to change the times in 0.5 second steps, or double-tap a value to type in a value directly. Press OK to confirm the times entered. Tap outside of the popup to cancel changes.
The Scene's Fade Time displayed in the scene list will be the longest element fade (which is defined as the longest Start time + Duration combined, or Switch At time).
Press the Scene View button at the top of the screen to return to the scene list.
When the Scene is fired, a progress bar below its Fade Time display in the List indicates the proportion of the Fade time that has passed.
Multiple Fade Time Edit
The ability to change multiple fade times (or other continuous functions) with a single numerical entry in the Scene Automation, Fade Timers menu. Allowing the user to efficiently set the fade time for subset of total channel paths (e.g. channel 1 to 32 of 64 channels). Or provide a way to set the fade time of all parameters in a channel, or all parameters in all channels, or a set of parameters in all path types.
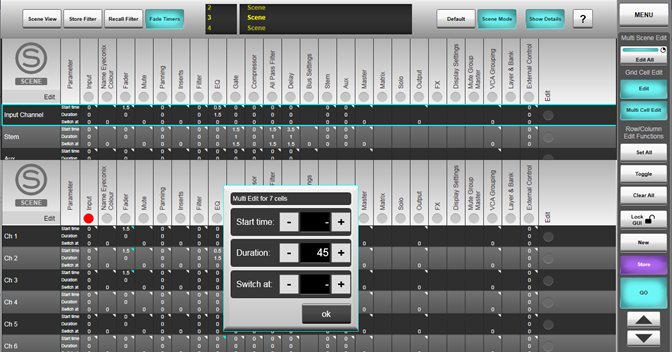
Multi Cell Edit Mode. Within the Fade Time UI (User Interface), the sidebar includes a Grid Cell Edit section. A Multi Cell Edit button sets both the upper 'path type grid' and the lower show details grid (when displayed) into a multi select mode, where a set of parameters across multiple paths of all types can be preselected to apply common absolute changes. The changes are applied to all cells in both grids added to the 'selected edit set.' The selected edit set is a temporary multi selection that is lost when the user turns Multi Cell Edit mode off. Within the grid, each square that is part of the currently selected edit set indicates to it is selected for editing with a cyan triangle in the top right corner. Multi Cell Edit set can be combined with Multi Scene Edit range mode to set multiple time values in a single, group or all existing scenes in Scene Mode. Or be used in Default mode to ensure time values are used for any new scene created.
Selecting Cells to be Part of the Edit Set. When in Multi Cell Edit mode cells in both grids can be individually selected with a single tap. A cell that is currently in the selected edit set can be removed from the set with a single tap. Cells in upper 'path type' section will select all paths of that type. If the section is made from the path type section of the UI, the cells in the associated Detail View grid (when opened) will also indicate they are included in the currently selected set with a cyan triangle. Cells in the Show Details grid will only select that specific function in that specific path to be part of the set. If a user manually selected ALL the parameters of all the paths of a certain type, the corresponding box in the top path type section would show as part of the selected set.
Row/Column Edit Functions To allow very quick selection of all parameters for individual paths, or all parameters on all paths of a certain type, every row in both grids includes a 'row Edit' column on the right-hand side. This column is only visible when Multi Cell Edit mode is enabled. In addition, both grids include a 'column Edit' row at the top of the grid, again this is only visible when in Multi Cell Edit mode. This column edit option is there to provide a method for putting all parameters of the same type across all paths into the selected edit set.
The Set All, Toggle and Clear All side bar edit function buttons are used to put fader/switch time parameters cells into the selected edit set. In the Fade Timers GUI using the row/column edit function keys only changes what cells are to be edited as part of a selected set, they do not actually change any states or values.
The 'row Edit' column header can be used to put multiple rows of the grid into edit mode. In addition, the 'column Edit' row heading can be used to set all columns into edit.
Changes to Fade Time Values At any point, any cell in the selected set can be double-tapped to open the pop up for Start Time, Duration and Switch at entry.
With Multi Cell Edit disabled, entry in the pop-up operates as:
- Only editing that cell
- Greying out the inputs that are not valid
- Showing the current numbers for the single cell.
- If no changes are made to all numbers, then no changes are applied when OK is actioned, even if the cell covers multiple paths with different current values.
- If a change is made to one of the numbers, then all 3 numbers are applied to the cell and any multiple paths covered by the cell. This means you cannot change the fade time on all channel's whiles keeping the start time set differently on different channels.
- Title based on the cell being edited.
With Multi Cell Edit enabled, the pop-up behaves slightly differently:
- All 3-input options are always available - even if the selected set does not have one option, the option will just not apply to the selected set cells.
- The title reads Multi Cells Selected for Editing.
- The "-" symbol is shown for all numbers in the popup signifying that multiple cells are being edited.
- If no changes are made to all the numbers no changes are applied when OK is actioned, even if the cell covers multiple paths with different current values.
- It is possible to edit any parameter and apply only one of the 3 fields, keeping the values of the other two fields intact for the selected set.
Transition Time
You can also define how long a Scene lasts, at the end of which the console will automatically move onto the next Scene in the display (that is not skipped; see below). This is the Transition time.
To set a Transition time for a Scene:
Touch the time display in the Transition column for the required Scene. The Auto Transition time configuration page will open in the bottom half of the screen.
Note: To navigate from a different Configuration page, touch the Auto Transition button in the left of the screen.Insert the required time into the Auto Transition time readout by touching each field's up and down the arrows to increment or decrement them.
You can also clear the time to 0 by touching Clear Time.
Now touch Apply, and the time value will appear in the Scene's Transition column.
When that Scene is Active, a progress bar below its Transition time display in the List indicates the proportion of the Transition time that has passed. When the Transition time is reached, the next Scene in the List will automatically become active.
The Transition function column can be disabled by touching the column title – it will go red and the column contents will become greyed out, indicating that the column is inactive. Scenes with Transition times will now stay active until a different Scene is triggered by another method.
Skipping a Scene
If you want to prevent a Scene from being triggered as part of a sequence, touch its Skip button (at the left edge of the Scene List). It will go blue to indicate that the Scene will be skipped each time it is reached. This also 'hides' the scene when navigating through the scene list using the arrow buttons and prevents the scene from being fired by any Input Actions or Trigger Time (see above).
Note: You can still trigger the scene manually by touching its GO button.The Skip function column can be disabled by touching the column title – it will go red and the column contents will become greyed out, indicating that the column is inactive. Scenes with Skip selected will now be triggered when they are reached.
Links to Further Automation Help:
- Automation Overview
- Scene Names and Notes
- Scene Input and Output Actions
- Scene Groups
- Function Filters
- Scene List Management
- Automation Preview Mode
Index and Glossary
