External Screen
An external display can be connected to the VGA output on the rear of the console. Any display that supports at least 1280 x 1024 pixels and has a VGA input can be used.
An external touch screen is also available. Please contact SSL for more information on purchasing this screen.
If using an external touch screen, connect the console's Monitor output to the screen via VGA. Now connect the screen's USB port to one of the console's USB Expander ports using a USB 2.0 A to B cable
Notes:External screen VGA connections should be connected to the console before the console is turned on.
USB connections for use with an external touch screen should be connected after the console has powered on.
Two different pages can be displayed on the external screen. The first is the Overview screen, which provides an overview of the settings and signal levels of each path. The other is the automation screen, allowing you to see the list of scenes and other automation related information. Both can also be displayed on the console's main screen.
You can choose which page is sent to the external display from the options menu. See Console Options for more details.
Overview Screen
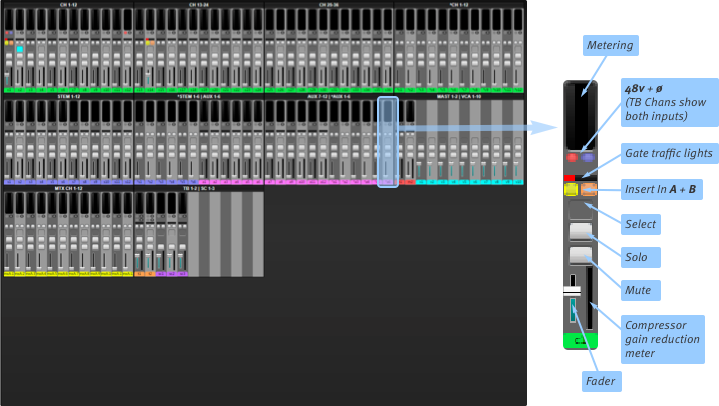
The overview shows all of the paths in miniature. Use the buttons on the right hand side to select different views.
The Zoom button can be engaged to increase the size of the paths on the display.
The View Select buttons change the paths displayed as follows:
-
Overview : All path types, arranged by their system layers (see Layer Manager). They are ordered as follows:
- Channels
- Stems
- Auxes
- Masters
- VCA's
- Matrix outputs
- Talkback paths
- Solo outputs
- Inputs : Input and Talkback Channels only
- Outputs : Output paths only (Stems, Auxes, Masters, Matrix, Solo Channels and VCAs)
- Tiles : Paths as they appear in the console's Fader Tiles active Layers
- Remote Tiles : Paths as they appear in the console's Remote Fader Tiles active Layers
It is also possible to view the overview page in the main screen by selecting it from the main menu (MENU > Overview).
Note: Overview can only be displayed in one screen at a time, so it will be removed from the external overview screen if selecting it to the main screen and vice versa.
Tip: Assign User Keys to quickly assign the Overview to the external or main screen.

Touching a path on the overview screen makes it the Selected path on the console, for manipulation using the Master Tile Focus Fader, Control Tile (if fitted) etc.
Double-tap the meters area to expand them (just like in the Channel View screen meters). This changes the overview strips to show larger meters, path name, colour, Mute, Solo and Select status.
Double-tap them again to minimise the meters and return to the previous view.
Notes:
Fader Tile layouts will not change if selecting paths from the overview screen, but the Selected path will be displayed in the Channel View and its Select button will light if it happens to be visible on a Fader Tile.
If you select a channel using the Fader Tile Select buttons, the same channel will become selected in the overview screen.
When a mouse is plugged into the console, you can control basic channel functions such as Mute and Solo using the buttons on the screen, including double-clicking the meters to expand or contract them.
- When input channels clip, they flash red in the Overview page.
- Displaying the Overview page on an external touch screen allows the operator to quickly identify clipping channels and tap them to Select, without having to navigate away from the Channel View on the Main Screen.
- Use the Overview screen to select multiple paths for use with Path Linking or Copy. Shift + click or touch the first and last strip to select a range of paths.
Automation
The other page that can be shown on the external display is Automation.
The top half of this page contains a list of all the scenes in your showfile. The bottom half can display a number of things, selected from the buttons in the lower left corner of the screen. If using a non-touch-sensitive external screen, you should decide what to view in the lower half of the screen (e.g. Scene Name to view the name and notes for the selected scene) before you assign it to the external display.
Alternatively, use a USB mouse to change the selection and navigate the automation screen at any time.
Note: Automation can only be shown on one screen at a time, so it will be removed from the external overview screen if selecting it to the main screen and vice versa.
Tip: Assign User Keys to quickly assign the Automation page to the external or main screen.

