
Layer Manager
On SSL Live consoles, there are no fixed layers or banks. The arrangement is entirely flexible, letting you arrange the various audio paths to suit your preferred method of working.
We strongly advise you to complete any changes in the Console Configuration page before working on the arrangement of Layers and Banks, as the Console Configuration defines what paths are available in the Layer Manager.
Definition: System and User Layers
There are two types of layers: System and User.
The System Layers include every audio path that exists in the Console, in order of type.
You might think of the System Layers as the library of paths used to build User Layers. System Layers cannot be edited, and cannot be directly Called onto the Fader Tiles.
The User Layers allow the paths in the System Layers to be arranged in any configuration, and it is these layers which are Called onto the control surface. Each path can be duplicated in as many User Layers as you like.
Definition: Layers/Banks
Each Fader Tile has its own User Layers. There can be up to six Layers for each Tile, and each Layer can have five Banks of 12 Faders.
Banks are called onto the surface by scrolling to their Layer using the arrow buttons to the right of the Solo buttons, then pressing the appropriate Bank Call button to the right of the faders.
User Layers are rearranged in MENU > Setup > Layer Manager.
Layer configuration uses a drag-and-drop method to copy paths from the System Layers, or from their current locations in the User Layers, into new User Layer locations.
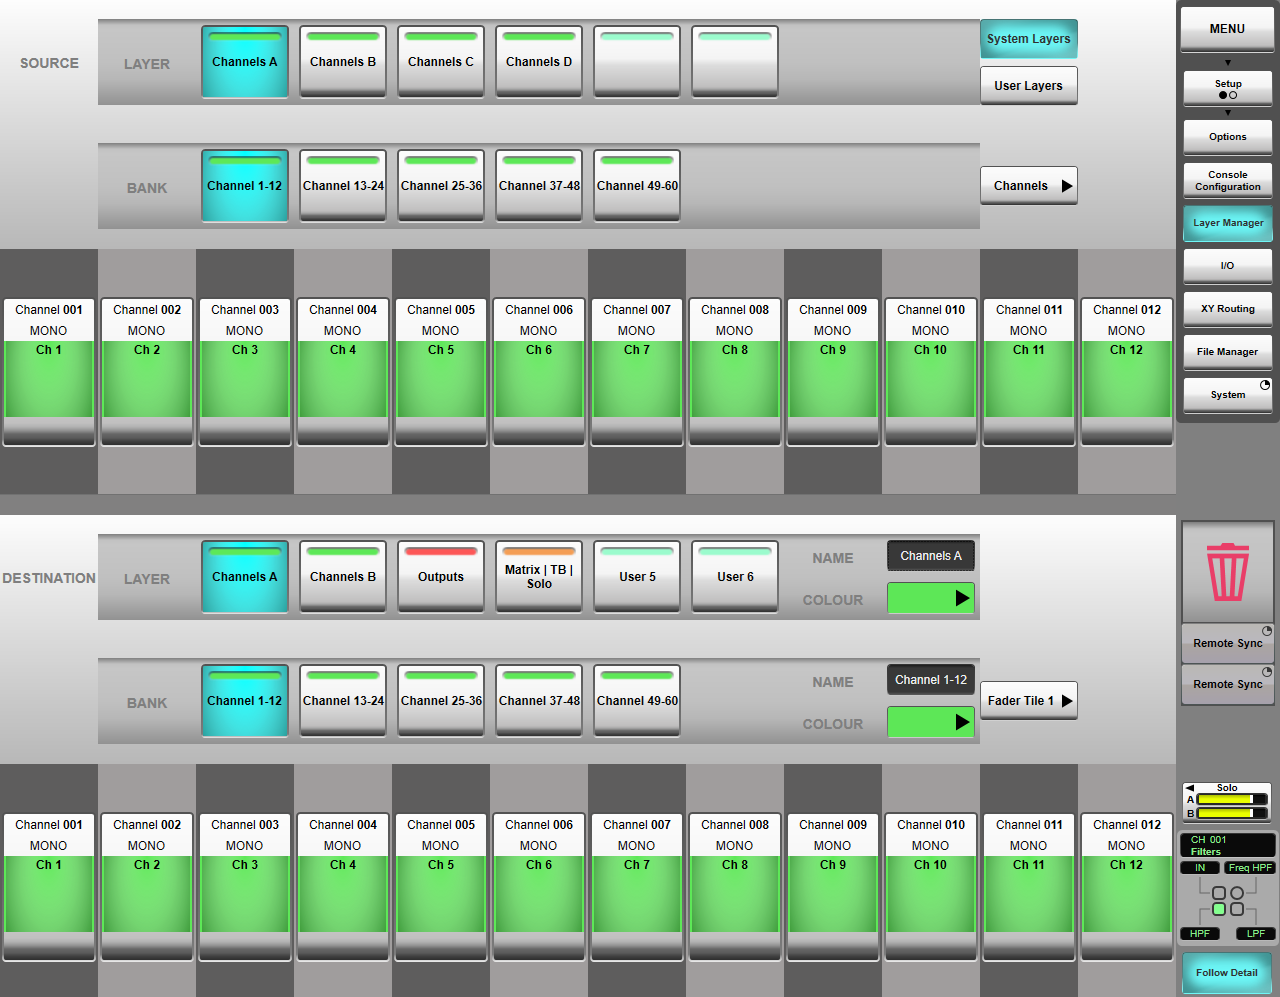
The Layer Manager screen is arranged in two halves: the Bank you are copying from is shown in the top half (Source), and the Bank being built is shown in the bottom half of the display (Destination).
The Source Layers can be copied in complete Layers, in complete Banks, or in a selection of individual paths within a Bank.
Setting Up User Layers
Select the Destination
Touch the Fader Tile button towards the lower right corner of the screen (in the Destination section) and select the Tile containing the Destination Bank you wish to configure using the submenu which appears.
The Tile layouts differ with console model:
| Fader Tile 1 | Fader Tile 2 | Fader Tile 3 | |
|---|---|---|---|
| L650 | Left | Centre (Below the screen) |
Right |
| L550, L500 Plus & L500 | Bottom right (Below the screen) |
Bottom left | Top left |
| L450 | Left | Centre (Below the screen) |
Right |
| L350 & L300 | Bottom right | Bottom left (Below the screen) |
N/A Only 2 tiles fitted |
| L200 | Left | Centre (Below the screen) |
Right |
| L100 | Below the screen | N/A Only 1 tile fitted |
|
Remote Fader Tiles may also appear in the tile list. These are additional Fader Tiles that can be connected to the console over USB. Please refer to the Remote Tile section for further information on these.
Touch a Layer button in the Destination section. It will go cyan and its Banks will be shown beneath it.
Touch the required Destination Bank button. Its current layout will appear in the display at the base of the screen.
Select the Source
Define which set of Layers are being displayed in the top half of the display by touching either the System Layers or User Layers button (top right corner of the screen).
If sourcing from System Layers, select the path type from the Channels button. If sourcing from User Layers (for copying between Tiles) select the source Tile from the Fader Tile button that appears.
Copying entire Layers and Banks
To copy an entire Layer (including all Banks and paths within it), touch and drag the Source Layer icon into the desired Layer position in the Destination section.
To copy an individual Bank within a layer, touch the relevant Layer icon in the Source section of the screen. Its Banks will be shown beneath it. Touch and drag the Source Bank icon into the desired Bank position in the Destination section.
Copying individual paths
To copy one or more paths from a Bank, touch the relevant Source Bank icon. Its paths will appear in the display beneath it. Touch the path(s) to be copied to highlight them.
Note: The selected paths do not have to be consecutive, however they will be copied into consecutive slots, overwriting any assignments which were previously in those locations.
Touch and drag the selected paths into one of the 12 slots at the base of the screen. The slots in the destination area will be highlighted cyan if the number of paths being inserted will fit in the space available.
Position the drag icon so that it is over the first Destination slot. The icon's outline will change from red to green and the first slot will turn blue when it is in a suitable position to be dropped.
Deleting Layers, Banks and paths
To delete an entire Layer (and all Banks within it) or an individual Bank, simply drag the Layer or Bank icon onto the bin  icon to the right of the screen.
To delete individual paths, tap on the path(s) to delete and drag onto the icon.
Note: There is no undo process for modifying Layers and Banks.
Rearranging the Destination Bank
You can rearrange the paths within the Destination section using a similar drag-and-drop method used to create them.
Touch a path (or paths) to be moved in the Destination section and drag to a different slot within the Bank. Available slots will be lit in cyan, with the selected slot highlighted blue as you drag the path(s) over it. Drop the path into the new position.
Copying Between Tiles
Once one Tile has been configured, its Layers and Banks can be copied to other Tiles. Select User Layers in the Destination section, then select the source Tile to see the Layers and Banks available.
Select the destination Tile in the lower half of the screen.
Drag whole Layers (including Banks) into the destination Tile's Layers, or individual Banks into the destination Bank icons, in the same manner as copying from System Layers as described above.
Similarly, individual paths can also be copied from one tile to another following the steps used for copying paths from System Layers.
Naming and Colouring Layers and Banks
Each User Layer and Bank have customisable colours and names. Their colour and name are shown in and above their Layer or Bank Selector buttons on the control surface.
The Layer and Bank Name and Colour selectors are located to the right of the Layer and Bank icons in the Layer Manager screen, and refer to whichever Layer and Bank are highlighted to their left.
Names
System Layers and Banks are named according to their contents. User Layers and Banks can be given User names as follows:
Select the Tile and Layer (and Bank, if relevant) in the Destination area, as described above.
Double-tap the appropriate Name text box to the right of the selected Layer or Bank. A keyboard will appear into which the name can be typed.
Delete any current text if required, using the red arrow buttons.
Type the new name and press OK.
Note: User Layers or Banks which are direct copies of System Layers/Banks will initially be given the same name and colour as the System Layer/Bank.Colours
To change the colour for a Layer:
Select the Tile and Layer (and Bank, if relevant) in the Destination area, as described above.
Touch the appropriate Colour selector, then select a colour from the drop-down list which appears.
Useful Links
Fader TilesIndex and Glossary
