
Automation Overview
SSL Live's automation system allows you to store and recall snapshots ('Scenes') of the console's settings. These can be recalled ('fired') manually, via timecode, or using external GPI/O or MIDI triggers.
Filter matrices allow you to filter what elements of the console are stored and recalled as part of each scene, allowing you to choose your level of real-time control within the event. Paths can also be protected from Scene recall directly from the path's Detail View. See: Function Filters
Each Scene can also be used to trigger external events such as outboard effects unit patch changes via MIDI. See: Input and Output Actions
Master Tile Controls
There is a dedicated Automation area in the console's Master Tile, between the two faders.
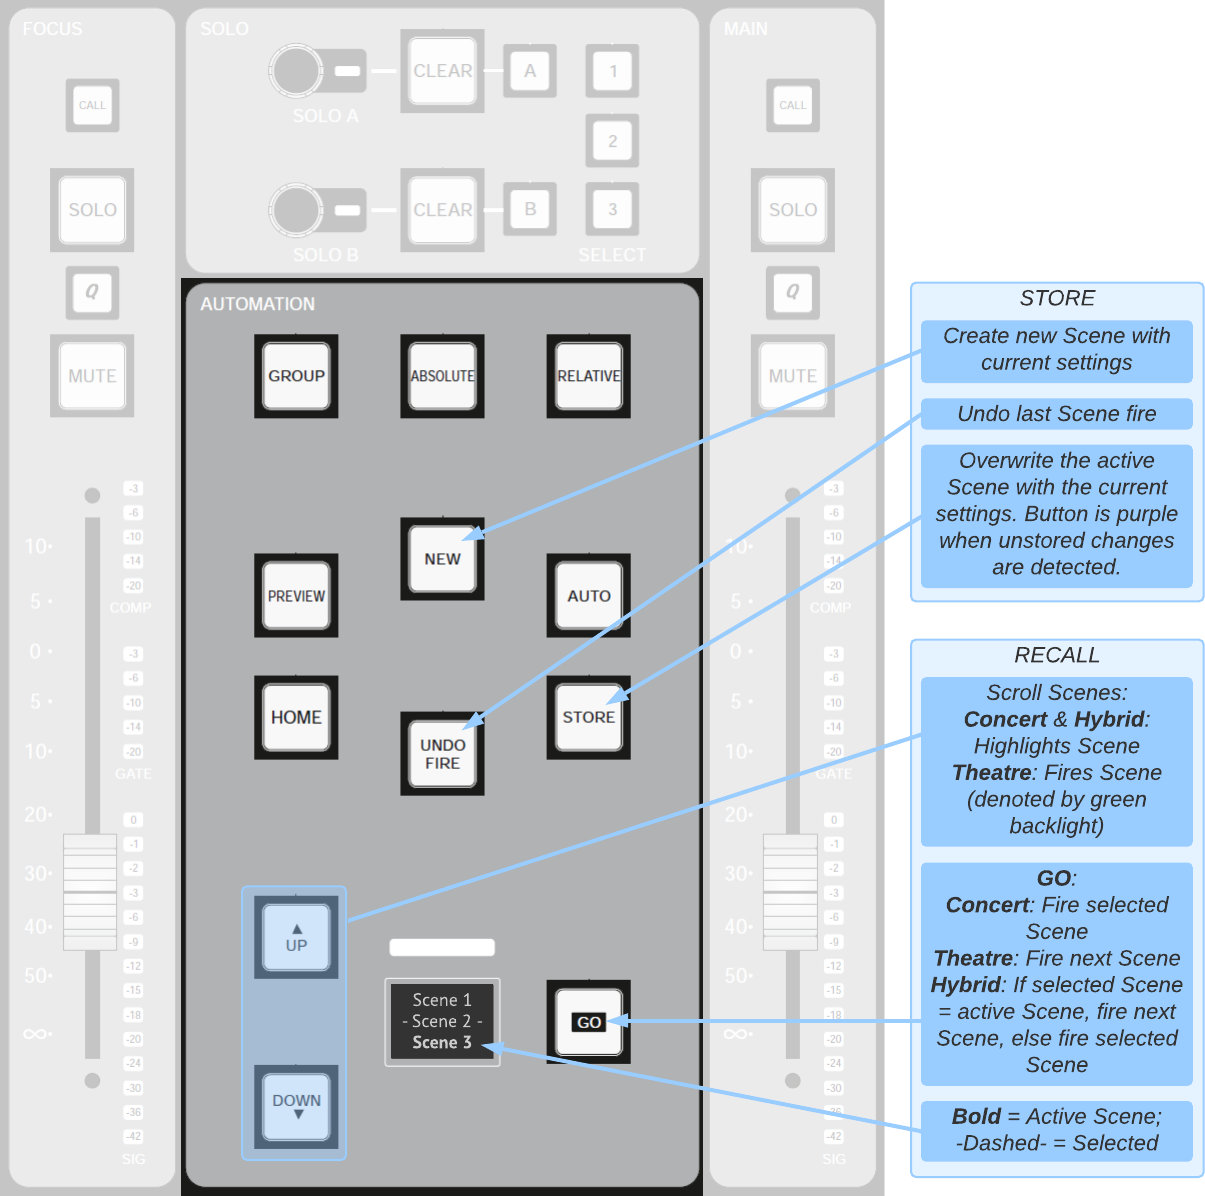
The controls towards the bottom of the area are used for recalling Scenes:
Use the ▲ and ▼ buttons on the left to scroll through the Scenes. The 'Selected' (highlighted) Scene is shown in the label screen to their right with dashes either side.
Press the GO button to 'fire' the Scene (making its settings active on the console). The currently 'Active' Scene is shown in bold.
Note: This description assumes 'Concert' mode; the ▲, ▼ and GO controls work differently in 'Theatre' and 'Hybrid' modes. See below for more details.These controls can be disabled using the Lock Tile button in the main Automation page (described below).
The rest of the controls are summarised as follows:
Group defines whether or not changes made to the Active Scene are also made to any Scenes grouped with it; the Absolute and Relative buttons next to it define whether changes to the Active Scene are copied as absolute or relative positions to the group (See Automation: Scene Groups for more details).
New creates a new scene, stores the current settings to it and makes it the Active Scene;
Store stores the current settings to the Active Scene. The Store button will turn purple if there are any unsaved changes;
If Auto is active (press & hold to activate and deactivate), console changes are automatically saved to the Active Scene. This will disable the Store button;
To undo a Scene fire, press Undo Fire. This will restore the console to its state prior to the last scene being fired;
Home navigates the Scene list to the Active Scene (i.e. makes Selected Scene = Active Scene);
Preview is unused.
There are also on-screen controls for New, Store, GO, ▲ and ▼ controls. These on-screen controls can be disabled by tapping the Lock GUI button.
Automation Screen Overview
More advanced Automation controls and indication are available via the on-screen Automation controls, accessed by selecting MENU > Automation:
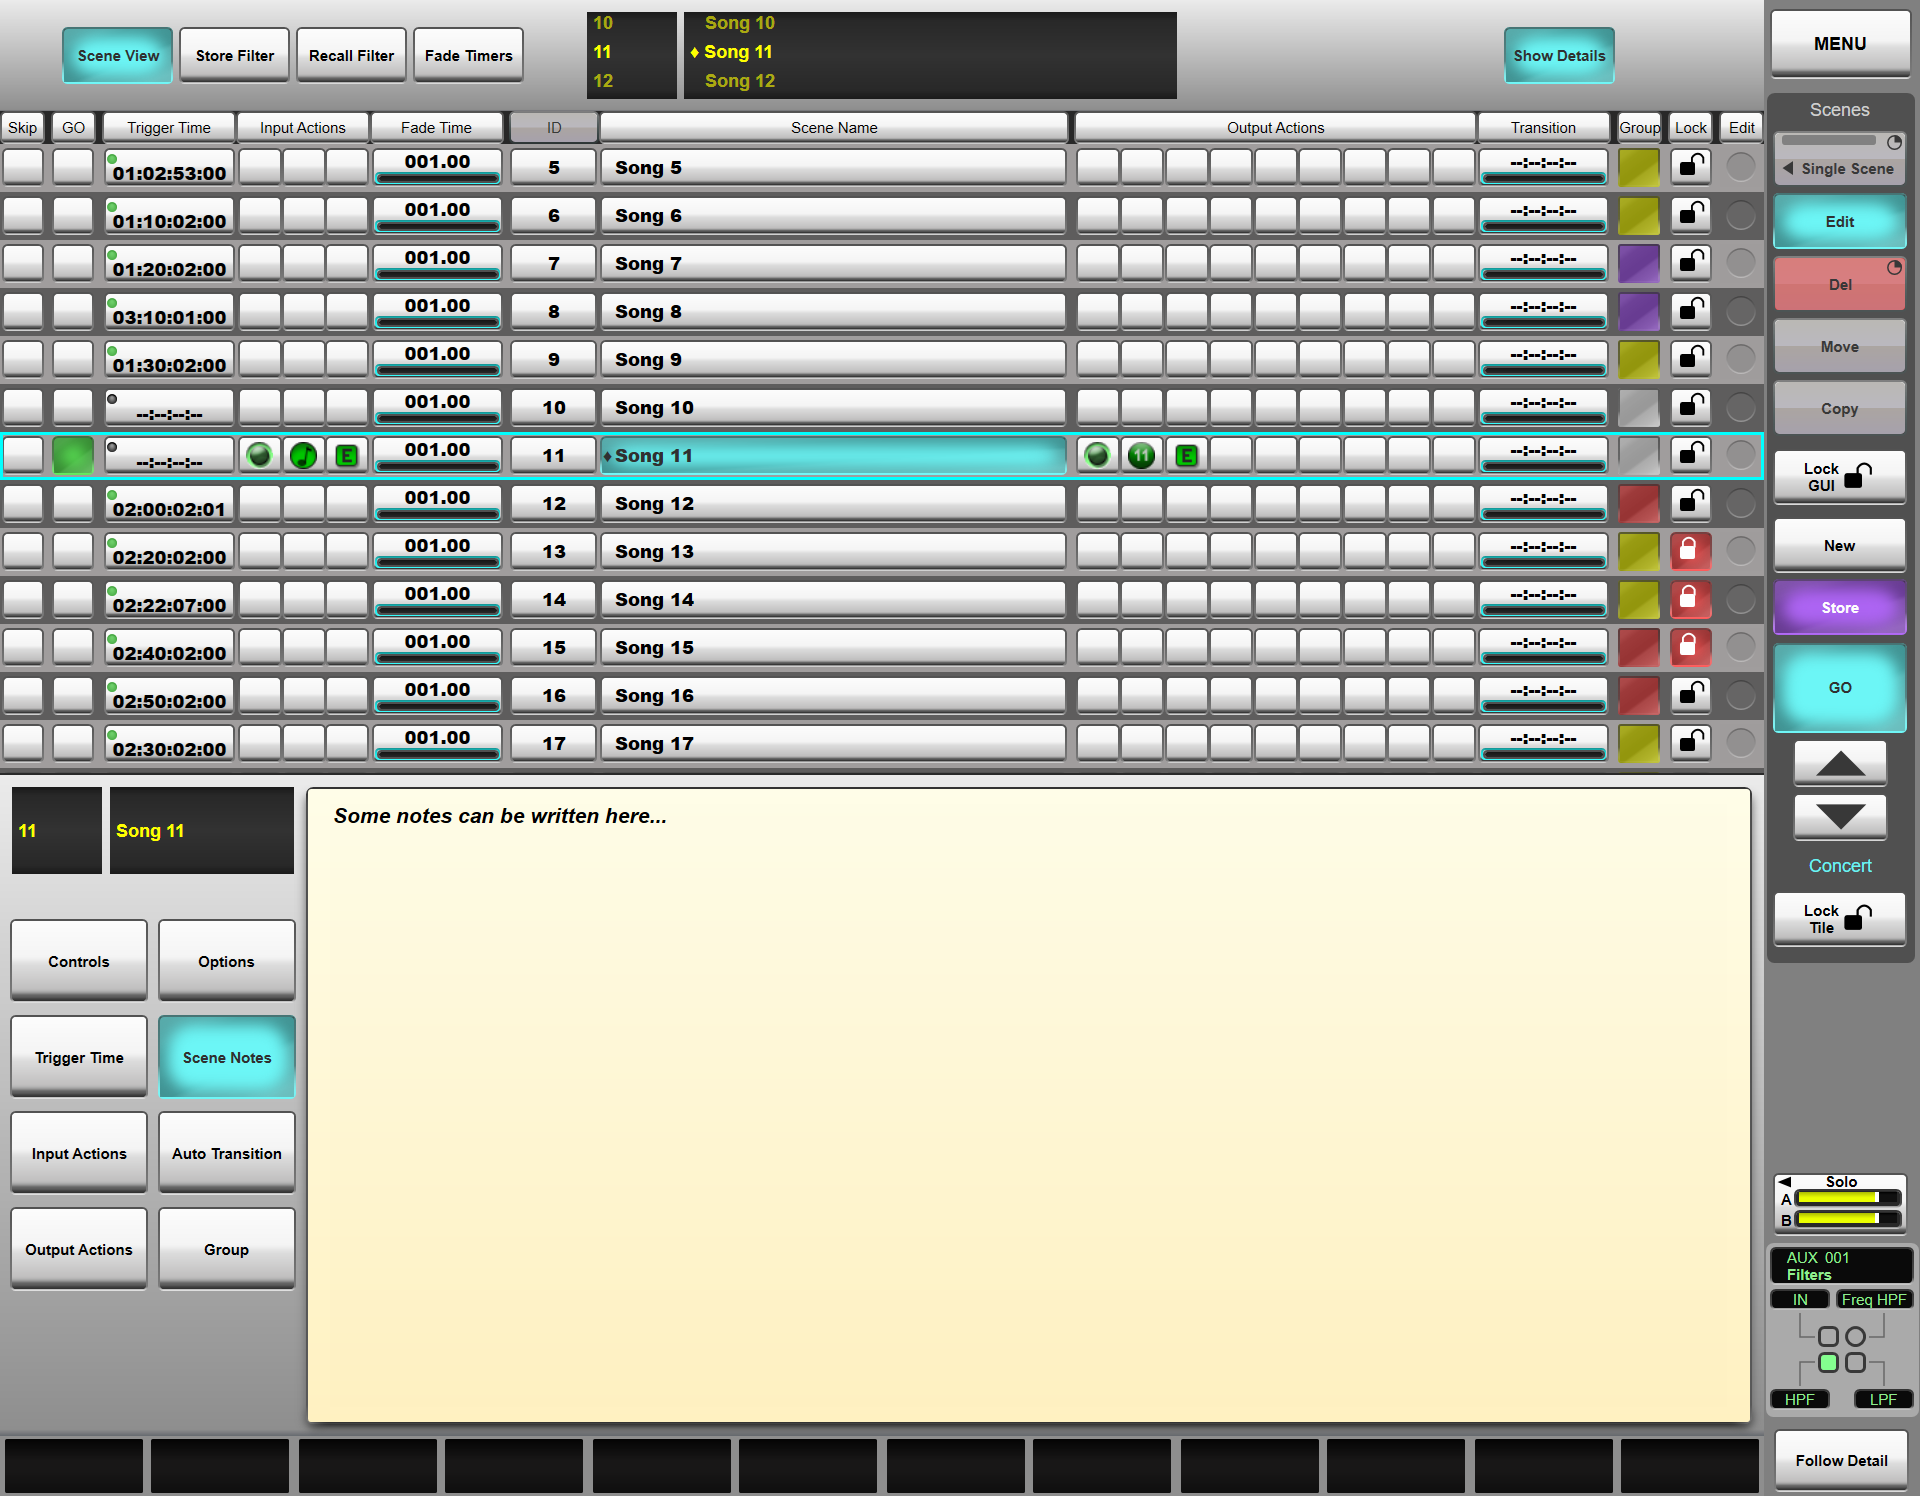
The top half of the Automation screen displays the Scenes List, while the bottom half displays the 'Detail dialogue' for the Selected Scene. Use the Show Details button to expand and collapse the Detail area as desired. The rest of the Help system assumes that the detail area is visible.
Note: The Master Tile Automation buttons are also available in the Automation Screen: select the Controls button in the left side of the Automation screen, and soft versions of the hardware buttons will appear in the screen.
Selecting a Scene
To select a Scene, simply touch its row in the Scenes List - the configuration page which is shown is defined by which column in the list is touched. Touching the button in the GO column will fire the scene as well as selecting it.
In Concert and Hybrid modes (see below) you can also scroll to the Scene with the ▲ and ▼ controls.
The buttons in the lower left of the Automation page can be used to change which page is displayed.
Once selected, a scene can be fired at the desired time using the GO button either on the Master Tile or in the side menu of the Automation page.
Creating a New Scene
To create a new Scene, select the Scene after which you want to place the new Scene. You can do this by touching the screen, or by scrolling to it using the ▲ and ▼ buttons in the Master Tile Automation area. The Scene will be highlighted with a blue surround.
Note: The ▲ and ▼ buttons will automatically fire the previous/next scene if in Theatre mode (buttons lit green) - see below for details.
Press the New button in the right-hand side of the Main Screen (or on the Master Tile).
A new Scene will be created after the previously selected one. It will automatically be made the Active Scene, as indicated by its GO box going green.
Note: A maximum of 500 scenes can be createdStoring Settings to an Existing Scene
The Scene must be the Active Scene (i.e. fired) before changes can be made. Note you will lose any changes to the previous scene unless they too are stored. Make any necessary changes to the Active Scene and press the Store button.
Note: Scene Stores are always applied to the Active Scene, regardless of which Scene is Selected.
Control Tile
It is also possible to view the Scene List within the Control Tile screen:
Press the Home button on the Control Tile then select Automation from the Home screen.

The Control Tile Automation screen has two display modes, chosen using the Scene List button in the top right corner of the screen; one shows the Scene List, complete with Scene Names and IDs, Group colours, Fade Times and Transition Times (as above).
The other view displays the currently Active Scene and its associated notes in the top half of the display. The lower half of the display shows the next Scene and its notes. If the Selected Scene is not the same as the Active Scene, the Selected Scene is displayed in the lower half of the screen instead.
The lower middle encoder can be used to scroll through the scene list in either view.
Concert, Theatre & Hybrid Modes
The Concert/Theatre/Hybrid Mode defines how the automation ▲, ▼ and GO controls function. To switch between the different modes, press the Options button on the left of the Automation Detail Dialogue and touch the Concert Theatre or Hybrid button. The mode is also indicated in the sidebar to the right of the Automation screen.
Concert Mode
If Concert mode is active, Scenes are only 'Selected' (highlighted) by the arrow buttons. The Selected Scene is then fired using the GO button.
The GO, ▲ and ▼ buttons will all light cyan to indicate Concert mode.
Note: Pressing GO when the Selected scene is already the active scene will re-fire the same scene, resulting in the loss of any unsaved changes.Theatre Mode
If Theatre mode is active, the previous and next Scenes are automatically fired when they are selected with the ▲ and ▼ buttons respectively. The GO button also fires the next Scene.
The GO, ▲ and ▼ buttons will light green to indicate that they will immediately fire the next/previous Scene in Theatre mode.
Hybrid Mode
If Hybrid mode is active, the arrow buttons select Scenes, as per Concert mode. If the selected Scene is also the active Scene, the GO button fires the next Scene, as per Theatre mode. If the active Scene is not the selected Scene then the GO button will fire the Selected Scene.
Simple and Accumulative Recall Modes
Scenes that have recall filters applied to them can be recalled in two different ways.
'Simple' recall mode treats each scene independently and disregards the recall filters and settings from any scenes before or after it in the list. Recalling a scene in this mode will recall only the settings set to recall in that scene.
'Accumulative' recall mode accumulates any changes that have been made between scenes even if recalling them out of order, as if each scene between the previous and next scene have been fired in sequence, so that if a parameter is set to be recalled in an intermediate scene, its value will be recalled even if the Active Scene's recall filter is off for that setting.
Accumulative Recall Example: The guitarist changes guitar in scene 5 for use in the rest of the show, so a different EQ setting is recalled in scene 5 only (EQ not recalled in any other scene). If jumping from scene 4 to scene 6, the new EQ setting is applied, even though scene 5 has not been fired and the EQ setting is not set to recall in scene 6.
To switch between Simple and Accumulative modes, press the Options button on the left of the Automation Detail Dialogue and touch the Simple or Accumulative button.
Preview Mode
As of Live v6.2, Preview mode is available. This mode allows the operator to fire into scenes without affecting the audio running through the console's DSP.
This is especially useful in complex or tight show rehearsals, where changes need to be made to future/past scenes, while allowing the audio to continue uninterrupted.
Please see the Automation Preview Mode page for more information.
