
The following pages contain instructions on setting up SSL Live consoles for use with a Dante network, routing to and from Dante devices and controlling and gain sharing with SSL Net I/O Stageboxes:
- Setting Up Dante (this page)
- Virtual Tie Lines
- Dual Domain Routes and Configuring Dante Devices
- Network I/O Stageboxes and Devices
- BLII & X-Light Bridges
Setting Up Dante
SSL recommends: For Dante-based systems, it is recommended that you complete Dante Certification Levels 1 & 2 on the Audinate website before proceeding.These certification courses will provide you with an introduction to Dante networks and will be very useful when setting up SSL Live Dante systems.
The certification courses can be accessed here: audinate.com/resources/training-and-tutorials/dante-certification-training
IP Address Settings
Before starting to configure your console it's important to understand that your SSL Live console contains five separate network adapters which must be configured to work with your external Dante network for correct operation. These devices are:
- Primary Dante Control Network
- Secondary Dante Control Network
- Primary Dante Expander Audio
- Secondary Dante Expander Audio
- Connectivity Network
If working with a BLII Bridge or X-Light Bridge, these network devices will also apply:
- Primary BLII/X-Light Bridge Audio
- Secondary BLII/X-Light Bridge Audio
Dante Control Primary & Secondary - Provides control over the Dante network including making/unmaking routes and controlling input parameters such as mic gain. This pair of adapters should live on the Primary and Secondary Dante networks respectively.
Dante Expander Audio Primary & Secondary - Provides transport of audio over the Dante network via the internal Dante Expander Module. The Dante Expander has no control over routing or stageboxes. This pair of adapters should live on the Primary and Secondary Dante networks respectively.
Connectivity Network - Used for remote control of the console via SOLSA, the Remote Expander, another SSL Live console or TaCo. This network is accessed from one of the three ports labelled NETWORK on the rear of the console. The Connectivity Network is a separate network from the Dante network and is not required for Dante operation. However, it is important to be aware of its IP address, as if set incorrectly, could conflict with your Dante network.
X-Light Bridge Console Link Primary & Secondary - Provides transport of the console's Dante Control and Dante Expander devices over the Dante network via the X-Light Bridge. This pair of adapters should live on the Primary and Secondary Dante networks respectively.
The above network devices should live on 3 separate networks:
These networks should contain the following devices.
-
Dante Primary
- Console's Dante Control Primary
- Console's Dante Expander Audio Primary
- BLII Bridge Audio Primary (if using BLII Bridge)
- X-Light Bridge Audio Primary (if using X-Light Bridge)
- Other Dante devices' Primary connection (e.g. Net I/O Stageboxes, Dante Virtual Soundcard, Third party Dante devices)
- A computer running Dante Controller
-
Dante Secondary
- Console's Dante Control Secondary
- Console's Dante Expander Audio Secondary
- BLII Bridge Audio Secondary (if using BLII Bridge)
- X-Light Bridge Audio Secondary (if using X-Light Bridge)
- Other Dante devices' Secondary connection (e.g. Net I/O Stageboxes, Dante Virtual Soundcard, Third party Dante devices)
-
Connectivity Network:
- Console Connectivity Network
- SOLSA in Remote mode (if used)
- A tablet running TaCo (if used)
- Another SSL Live console in Remote mode (if used)
Each network should have its own subnet. And every device on one network must have an IP address within the same subnet in order for those devices to communicate with each other.
Each of the network devices require a unique IP address within the correct subnet for the network they are connected to.
Notes:The Dante Control and Dante Expander Audio are both accessed from the Dante Expander Primary and Secondary ports on the back of the console. An internal network switch in the console joins these two separate network devices. However, they both have individual IP settings. For example the Dante Control Primary and Dante Expander Primary must have different IP addresses within the same subnet.
The Dante Control and Dante Expander Audio can also be accessed via the X-Light's Console Link ports. Care should be taken not to create a network loop if connecting both console Dante Expander and X-Light ports to the same network.
To correctly set up Dante with control on SSL Live consoles, both the Dante Control and Dante Expander Audio network devices must be configured.
To correctly set up Dante with control on SSL Live consoles using a BLII/X-Light Bridge, the Dante Control, Dante Expander Audio and BLII/X-Light Bridge Audio network devices must be configured.
SSL Live consoles ship from the factory with the following IP address settings:
| Network Interface | Fixed/DHCP | IP Address | IP Address Configured Using |
|---|---|---|---|
| Primary Dante Control | Fixed | 10.101.x.x | MENU > Setup > Options > NETWORK tab |
| Secondary Dante Control | Fixed | 10.102.x.x | MENU > Setup > Options > NETWORK tab |
| Primary Dante Expander Audio | Fixed | 10.101.x.x | Dante Controller (available for free from the Audinate website) |
| Secondary Dante Expander Audio | Fixed | 10.102.x.x | Dante Controller (available for free from the Audinate website) |
| Connectivity Network | DHCP | - | MENU > Setup > Options > NETWORK tab |
A BLII/X-Light Bridge ships from the factory with the following IP address settings:
| Network Interface | Fixed/DHCP | IP Address | IP Address Configured Using |
|---|---|---|---|
| Primary BLII/X-Light Bridge Audio | DHCP | - | Dante Controller (available for free from the Audinate website) |
| Secondary BLII/X-Light Bridge Audio | DHCP | - | Dante Controller (available for free from the Audinate website) |
SSL Net I/O Stageboxes ship from the factory with the following IP address settings:
| Stagebox | Network Interface | Fixed/DHCP | IP Address | IP Address Configured Using | |
|---|---|---|---|---|---|
| SB 16.12 & SB 32.24 | Main (Net A) |
Primary | DHCP | - | Dante Controller (available for free from the Audinate website) |
| Secondary | DHCP | - | Dante Controller (available for free from the Audinate website) | ||
| Comp (Net B) |
Primary | DHCP | - | Dante Controller (available for free from the Audinate website) | |
| Secondary | DHCP | - | Dante Controller (available for free from the Audinate website) | ||
| SB 8.8 & SB i16 | Primary | DHCP | - | Dante Controller (available for free from the Audinate website) | |
| Secondary | DHCP | - | Dante Controller (available for free from the Audinate website) | ||
For each IP address above, the netmask (also called subnet mask is 255.255.0.0)
Important Things to Remember:
- IP addresses for each device must be unique.
- Dante Primary and Secondary networks must never be physically linked.
- Multiple network adapters on the same device may not be given addresses in the same subnet
- Dante Primary and Secondary addresses must be in different subnets.
- Dante Primary will use the 169.254.x.x subnet when set to auto-configure. This is standard IPv4 protocol and therefore the same behaviour as the Connectivity network.
- On all Dante devices (other than SSL Live consoles, please see "Fixed IP Addresses" below) Dante Secondary will use the 172.31.x.x subnet when set to auto-configure. This is still a private address within IPv4, and is not reserved exclusively for auto-configuration, making its use for secondary auto-configuration unique to Dante.
- In addition to being configured in different subnets, Connectivity, Dante Primary and Dante Secondary should be treated as three physically separate networks, with their own network hardware.*
- Default Gateway settings must be left blank as there is no current application for Dante.**
* There are exceptions - you may have a configurable network switch that could serve multiple networks, separated out using VLANs. Although this would work, reasons to keep hardware separate are primarily related to failover - if this single switch failed, both Primary and Secondary networks would fail, defeating the purpose of a secondary network, so it is not recommended for Live usage cases.
**Default Gateways are used to route IP data between subnets. This is not supported in Dante, and entering gateway settings will link Primary and Secondary subnets together, which is invalid.
SSL Live Recommendations
Fixed IP Addresses or DHCP with SSL Live? SSL Recommends:SSL recommends that for Dante networks containing an SSL Live console, Fixed IP addresses are used for all Dante devices on the Secondary network unless a DHCP server is present.
Dynamic Host Configuration Protocol (DHCP) is a network protocol that allows a server to automatically assign an IP address to a device in a defined range, known as a scope. DHCP may also provide information about gateways and DNS servers (not usually required if in a closed network dedicated for audio transport).
If two or more of the console's three control network adapters (Connectivity, Pri & Sec Dante Control) are set to DHCP with no DHCP server present on any of the networks, the console's network adapters would be auto-configured to be within the same 169.254.xx.xx subnet. This is an invalid configuration and will cause incorrect operation on the Dante or Connectivity network, or both.
Therefore, if all Dante devices are set to DHCP, SSL recommends that a DHCP server is present on all networks being used.
Alternatively, using Fixed IP addresses for all devices on both the Dante Primary and Dante Secondary networks prevents the Dante Control Primary and Secondary network adapters from being auto-configured to IP addresses within the same subnet, and therefore helps to prevent the networks from becoming linked. The Connectivity network can safely be set to DHCP in this instance provided the fixed address ranges used for Dante Primary and Secondary devices do not overlap with the Connectivity network's DHCP scope (or in the 169.254.xx.xx scope if no DHCP server is present on the Connectivity network).
If using multiple DHCP servers (e.g. one for each network) they should be configured to issue addresses within unique subnets to ensure their scopes do not overlap with that of any other network's fixed/DHCP range.
If you do not have a DHCP server on the Connectivity Network, set this adapter to a fixed address, in a different subnet to the Primary and Secondary Dante networks. Set all other devices on the Connectivity Network to a Fixed IP address within the same subnet. For more information on setting up the Connectivity Network please go to Remote Surfaces or TaCo Tablet Control.
IP Address Clash Warnings
If more than one of the console's network adapters are set to IP addresses within the same subnet, a series of warnings will be displayed to notify of an IP address clash. This is an invalid configuration and must be resolved.
For more information please see IP Address Clash Warnings.
Finding a Dante device set to a Fixed IP address in a different subnet
The Audinate website contains detailed instructions on how to locate devices that have been set to a Fixed IP address in a different subnet to your computer. www.audinate.com/faq/how-can-i-locate-dante-device-static-ip-address-unknown-subnet
Alternatively, the free download Wireshark can be used to identify the IP address of devices on the network.
First, download Wireshark from their website here: www.wireshark.org and install the program on your computer.
Wireshark works by reporting all of the IP addresses of devices on a network. To simplify the investigation, connect your computer directly to the Dante Primary adapter on the device in question.
Open Wireshark. All of your computer's network adapters will be listed. Double click on the network adapter you are using for Dante Primary. Most laptops only contain one network adapter, and therefore only one wired network connection will be displayed.
All of the devices on the network will now be displayed by their IP address. If you have connected directly to the device in question, only two IP addresses will be visible here: the device in question, and your computer.
Identify which IP address is that of your computer.
The IP addresses of Mac computers can be viewed in System Preferences > Network. Click on the Ethernet network adapter to the left to display the Mac's IP address.
For PC computers, open Command Prompt, type ipconfig and press Enter on your keyboard. The IP address of your PC will be displayed beside IPv4 Address.
Once you have identified which of the IP addresses displayed in Wireshark is that of your computer, the remaining IP address will be that of the device in question.
Set the IP address of your computer to within the same subnet as the device in question and it will then be visible in Dante Controller. Change the device's IP addresses so that they are within the subnets you wish to use for Dante Primary and Secondary and set the IP address of your computer so that it is back within the range you are using for Dante Primary.
Step 1: Setting the Dante Control IP Addresses
This section describes how to set the IP addresses for the Primary & Secondary Dante Control network adapters, which provide control over the Dante network including making/unmaking routes and controlling input parameters such as mic gain. This pair of adapters should live on the Primary and Secondary Dante networks respectively.
On the console go to MENU > Setup > Options > NETWORK tab.
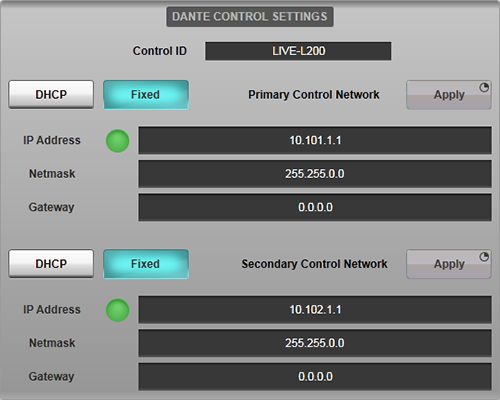
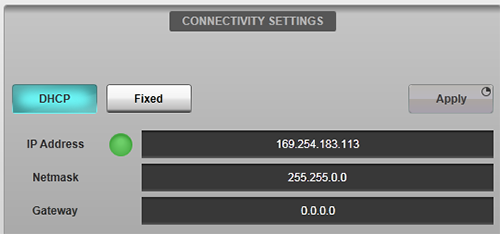
The screen will show you information for the Connectivity network on the left and the information for Primary and Secondary Dante Control Networks on the right.
Notes:These addresses are for the network adapters used by the console to send/receive control data to/from the Dante network, not the address of the Dante audio connections. The Dante Control network adapters are not visible in, and cannot be configured by Dante Controller.
For our example we are going to set the Primary Control Network adapter with the following settings:
IP Address: 10.101.1.1
Netmask: 255.255.0.0
Gateway: 0.0.0.0
First set the adapter type to Fixed, then double-tap the IP Address and Netmask boxes and enter the values above. Once this is done, press and hold the Apply button and wait for the network adapter to restart.
Next set the Secondary Control Network adapter with the following settings:
IP Address: 10.102.1.1
Netmask: 255.255.0.0
Gateway: 0.0.0.0
Set the adapter type to Fixed, then double-tap the IP Address and Netmask boxes and enter the values above. Once this is done, press and hold the Apply button and wait for the network adapter to restart.
In our example, the Connectivity network adapter address settings should be left as DHCP. If this needs to be set to a Fixed IP address at a later date, ensure that a different subnet is used to that of the Dante networks.
Step 2: Setting the Dante Audio Network IP Addresses and Names
To set the IP addresses of the console's Dante Audio Network devices you will need a computer running Audinate's Dante Controller application, which you can download here: www.audinate.com/products/software/dante-controller
Set your computer's network adapter to have a fixed IP address of 10.101.10.10, with a netmask of 255.255.0.0. Now connect your computer's network port directly to the Dante Pri port on your console and launch the Dante Controller application.
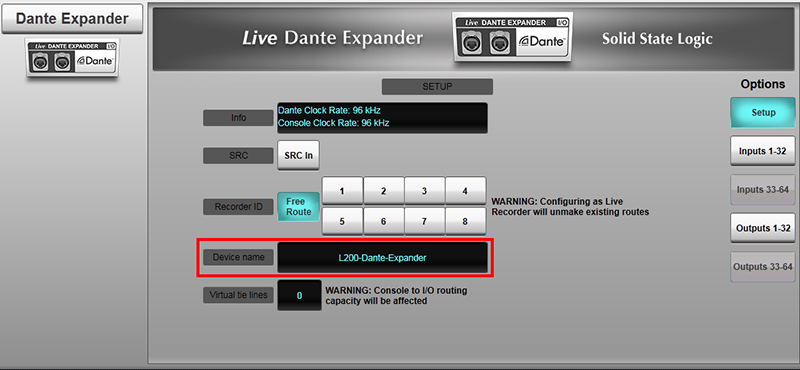
In Dante Controller find the console, in our example L200-Dante-Expander
(on initial setup this name will be different).
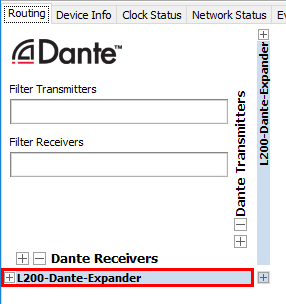
Double-click on the device name and select the Device Config tab in the Device View window.
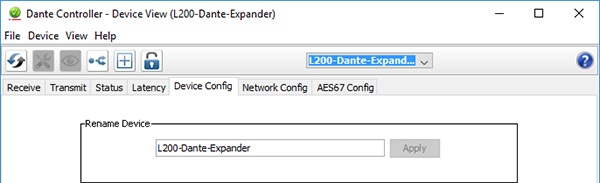
Enter a suitable name in the Rename Device field so it can be easily identified in Dante Controller by anyone using the network. The console model and venue location is often sufficient (e.g. "L200-FOH"), unless a very large network is being configured.
In our example make sure the Dante device Sample Rate is set to 96 kHz as shown above.
Next select the Network Config tab. This page shows the IP addresses for the console's Dante Audio Network devices.
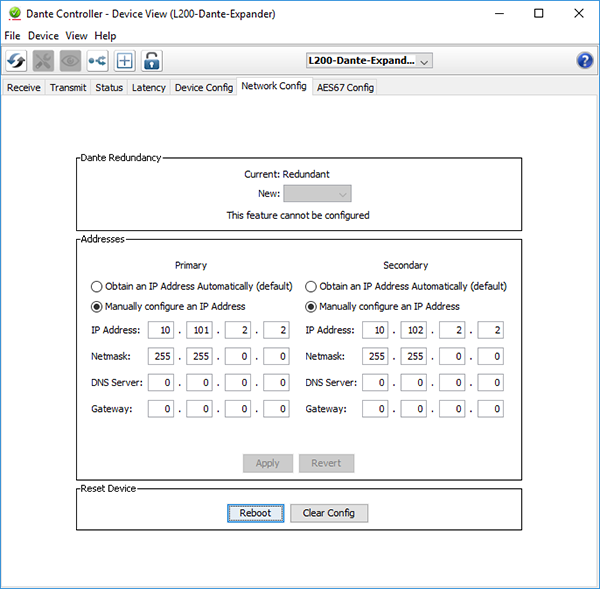
For our example we will use the following IP address settings for the Primary adapter:
IP Address: 10.101.2.2
Netmask: 255.255.0.0
For the Secondary adapter use:
IP Address: 10.102.2.2
Netmask: 255.255.0.0
Press Apply for the changes to take effect. You will be asked to confirm the IP address change, click Yes. The device must now be rebooted for changes to take effect. Click Reboot. You will be asked to confirm the reboot. Click Yes.
Notes:For our example please ensure the Virtual Tie Lines value is set to 0 in the Dante Expander Detail view (in MENU > Setup > I/O > Local/MADI Configuration). This is for the simplicity of the example. For more information on configuring Virtual Tie Lines please see Working with Virtual Tie Lines.
Step 3: Setting the Dante Audio Network and Dante Control Network Names
To easily identify the console on a Dante network the console uses two unique, user defined names:
Dante Device Name - Identifies the console's Local Dante audio interface (the name visible in Dante Controller and set in step 2 above)
Control ID - Identifies the console as a Dante device controller (the name used for ownership of Net I/O stageboxes)
Important: These two names must NOT be the same.The Dante Device Name can be found in MENU > Setup > I/O > Local/MADI Configuration > Dante Expander. This name should be populated automatically when the console is connected to a Dante network. However, if the name is not automatically detected, enter the name manually by double-tapping on the Device Name field and entering the name exactly as it appears in Dante Controller.
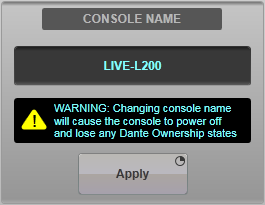
The Control ID name can be seen in the MENU > Setup > Options > NETWORK tab. In the example below the Control ID is LIVE-L200.
The Control ID is taken from the Console Name, which can be changed in the System page (MENU > Setup > System / Power > System tab), in the Console Name section. Double tap on the name to edit it. Then press and hold Apply.
 Please note:
Changing the Console Name will power off the console and the console will lose ownership of all Net I/O stagebox parameters. This is because the console uses the Control ID (which is taken from the Console Name), to Own stagebox inputs and parameters. All previously owned inputs and parameters of the stagebox will need to be re-owned. For more information on how to Own inputs and stagebox parameters please go to Controlling Net I/O Stageboxes and Ownership
Step 4: Connecting SSL Net I/O Stageboxes (and other Dante Devices)
Now you have configured your console's Dante settings we can start to add network switches and other Dante devices to the network.
Notes:The Primary and Secondary networks must remain physically separate at all times. Please do not connect the Primary and Secondary switches together, and similarly please do not connect a device's Primary connection to the Secondary switch and vice versa.
All SSL Stageboxes ship configured DHCP.
To setup a Fixed IP address on a Stagebox connect your computer (configured to use a DHCP address), directly to the stagebox and use Dante Controller to set the Fixed IP address (following the instructions in Step 3).
Every device on one network must have an IP address within the same subnet in order for those devices to communicate with each other.
So for our example any device connected to the Dante Primary network must have an IP address as follows:
IP Address: 10.101.x.x
Netmask: 255.255.0.0
Notes:We have already used IP addresses 10.101.1.1, 10.101.2.2 and 10.101.10.10 on the Primary Network. These IP addresses cannot be used for an additional device on the network.
For the Dante Secondary network any connected device must have an IP address as follows:
IP Address: 10.102.x.x
Netmask: 255.255.0.0
Notes:We have already used IP addresses 10.102.1.1 and 10.102.2.2 on the Secondary Network. These IP addresses cannot be used for an additional device on the network.
Using Dante Controller or the console's Dante I/O Setup page, set all connected Stageboxes to 96 kHz sample rate. This is because we have already set the Dante Expander module to 96 kHz earlier in this example setup process. Dante routes are not possible between two devices with different sample rates. So to create a route between two Dante devices, those devices must be running at the same sample rate.
Clocking over Dante
Please refer to the Dante section of the Clocking page to correctly configure the console and network clocking for correct operation.
Dante Domain Manager
The console is capable of connecting to a managed domain within a network controlled by Dante Domain Manager (DDM). The console must be logged into the same domain as any I/O devices you wish to route to/from or control.
Important Note: The console's Local Dante Expander (Brooklyn II) module and any BLII or X-Light Bridges must be enrolled in to the same domain as the I/O and console's control software. This is done using Dante Domain Manager.More information on logging the console into a domain can be found in the Network Options section.
SSL Live Dante Interfaces
Dante Expander Module
SSL Live consoles have the option to fit a Dante Expander Module which comprises a Dante Brooklyn II Module for making audio connections to and from a Dante network.
The number of channels available for routing on the console will vary based on the console and Dante network sample rates. If the Dante network is running at a different sample rate or in a different clock domain to the console, engage the SRC In button. This will sample rate convert incoming and outgoing audio between the console and Dante network. The table below summarises the sample rate combinations available (note the number quoted is for each direction, e.g. 32 = 32 inputs AND 32 outputs):
| Console Sample Rate | Dante Expander Sample Rate | Dante Expander Sample Rate Conversion | Quantity of Dante Inputs and Outputs |
|---|---|---|---|
| 96 kHz | 192 kHz | SRC In | 16 |
| 96 kHz | 96 kHz | SRC Out | 32 |
| 96 kHz | 48 kHz | SRC In | 32 |
| 48 kHz | 192 kHz | SRC In | 16 |
| 48 kHz | 96 kHz | SRC In | 32 |
| 48 kHz | 48 kHz | SRC Out | 64 |
The Dante Expander Module supports Dual Domain Routes as well as Virtual Tie Lines. For more information please see Dante Dual Domain Routes and Dante Virtual Tie Lines.
Net I/O BLII/X-Light Bridge
A Net I/O BLII Bridge or X-Light Bridge can be connected to SSL Live consoles to deliver an extra 256 Dante inputs and outputs at 96 kHz or 48 kHz.
SSL Live consoles can utilise the Dante I/O of a BLII/X-Light Bridge and a Dante Expander module simultaneously.
The BLII/X-Light Bridge supports both Dual Domain Routes and Virtual Tie Lines. For more information please see Dante Dual Domain Routes, Dante Virtual Tie Lines and BLII & X-Light Bridges.
Further Reading
If you would like to learn more about Dante, the following resources are available:
SSL Live Application Notes
LAN-009 Configuring a Live Console for Use with Dante
LAN-010 Live Dante VTL / DDR Concepts and Configuration
LAN-012 Live Console IP Address Configuration Guidance
Audinate Website
The Audinate website is a fantastic resource for further documentation, video tutorials and whitepapers. Audinate also offers an online Dante Certification programme.
Useful Links:
Dual Domain Routes and Configuring Dante DevicesNetwork I/O Stageboxes and Devices
Virtual Tie Lines
BLII & X-Light Bridges
Local/MADI I/O Configuration
Installation Guide
Index and Glossary
