
Event Manager
The Event Manager allows programming of state-driven actions on the console. Events can be configured in the Event Manager page (Menu > Tools > Event Manager). The top half of the page displays a list of all configured events. Engage the Edit button in the sidebar to modify the event list.
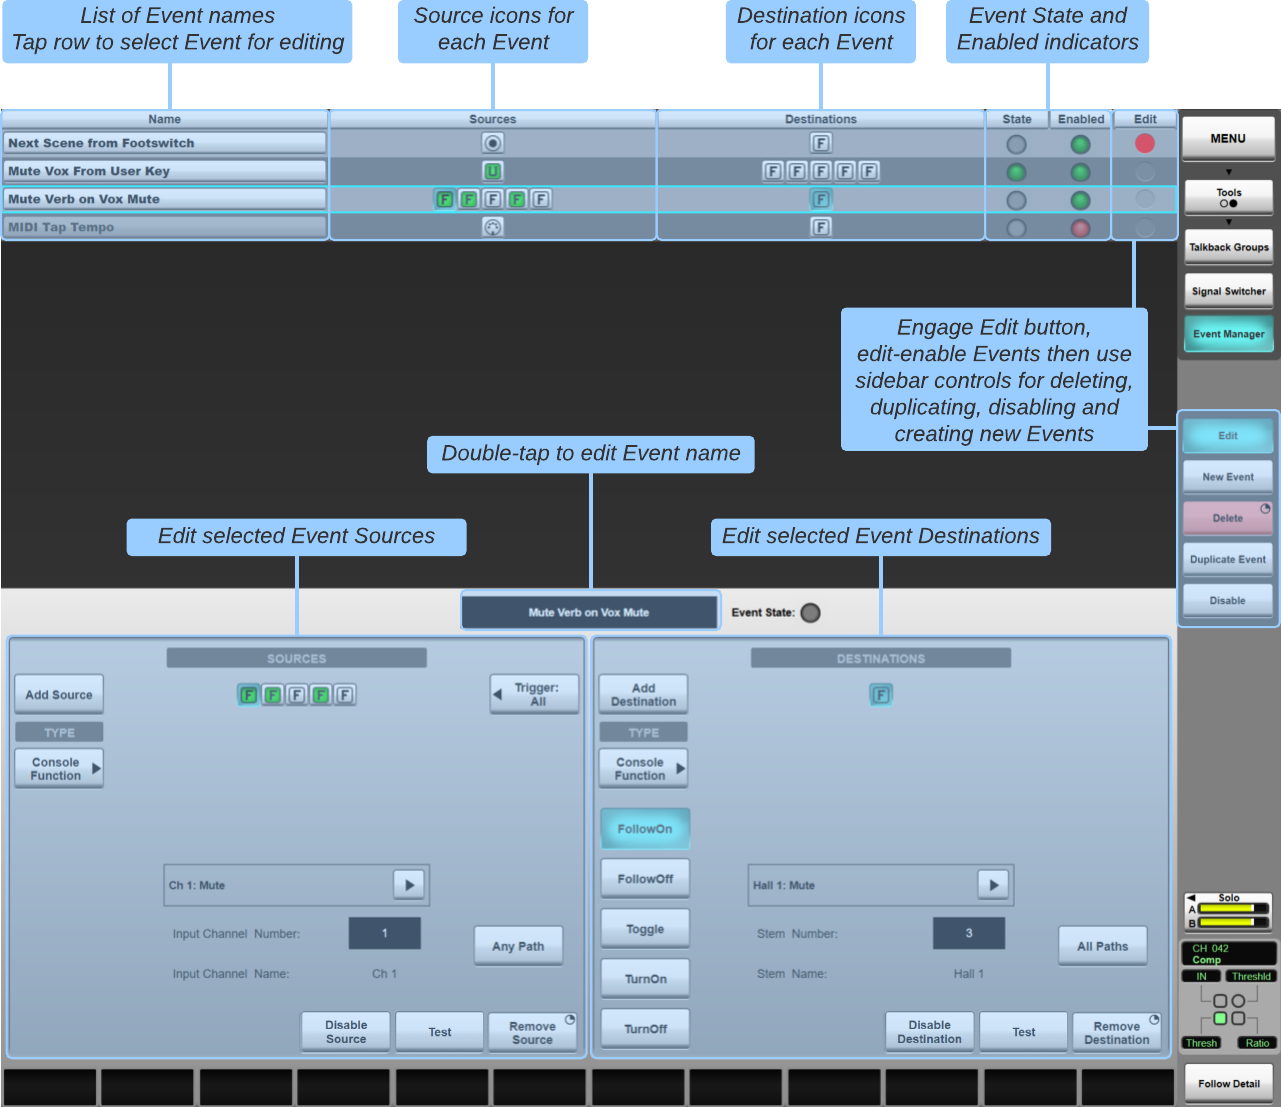
Press New Event to create a new event. Events are configured in the lower half of the screen. Double-tap the name field in the centre of the page to rename the event. Event triggers (sources) and actions to perform when the trigger conditions are met (destinations) are added here to define the event's functionality.
To delete an event, enable Edit mode from the sidebar and use the round buttons in the Edit column of the event list to edit-enable the event(s). Press & hold the Delete button in the sidebar to delete the selected event(s).
Note: Event deletion cannot be undone!
To disable an event without deleting it, edit-enable the event(s) in the list (as per delete operation above) and press the Disable button in the sidebar. Disabled events are identified by a red icon in the Enabled column of the events list. See below for disabling individual Sources and Destinations.
To duplicate an event, edit-enable the event (as per delete operation above) and press the Duplicate Event button in the sidebar. This will create a duplicate event, appending the original event name with a number, e.g. "New Event (1)".
The current state of each event is indicated in the State column. The indicator will light green when the event is active (i.e. all source conditions have been met).
Event Sources
Use the Add Source button to add a new event source. Up to 12 sources can be added per event. Events can be triggered when Any or All source conditions are met by selecting the appropriate Trigger option in the top right corner of the Sources section. When any/all event source states become true, the event state becomes true and all event destination actions are triggered.
Use the Remove Source button to delete the selected source from the event.
Note: Removing a source cannot be undone; it must be re-added manually.
Use the Disable button to disable the selected source from triggering the event, without permanently deleting it. This allows certain sources to be temporarily removed from the event logic (e.g. if the source is producing erroneous signals) without permanently losing the source's settings.
The current state of each source is indicated by its icon in the event list and source detail area. A green icon indicates that the source condition has been met and will contribute to activating the event.

|
Source assigned, not activated |

|
Source activated |

|
Source disabled |
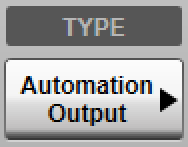
When adding a new source, use the TYPE option to the left of the source area to choose the source type. Source options are:

|
None (unassigned) |

|
Automation Output |

|
GP Input (GPI) |

|
MIDI Input |
|
|
Console Function |

|
User Key |

|
Fader Function |
The console's automation scenes can be used to trigger events. Follow the configuration steps below:
Select the Automation Output source type in the Event Manager page.
This Automation event source can now be linked to a scene's Output Action. From the console's Automation page, select the desired scene, go to the Output Actions section and select the Event action type.
Select the event from the list of LINKABLE EVENTS and press Apply.
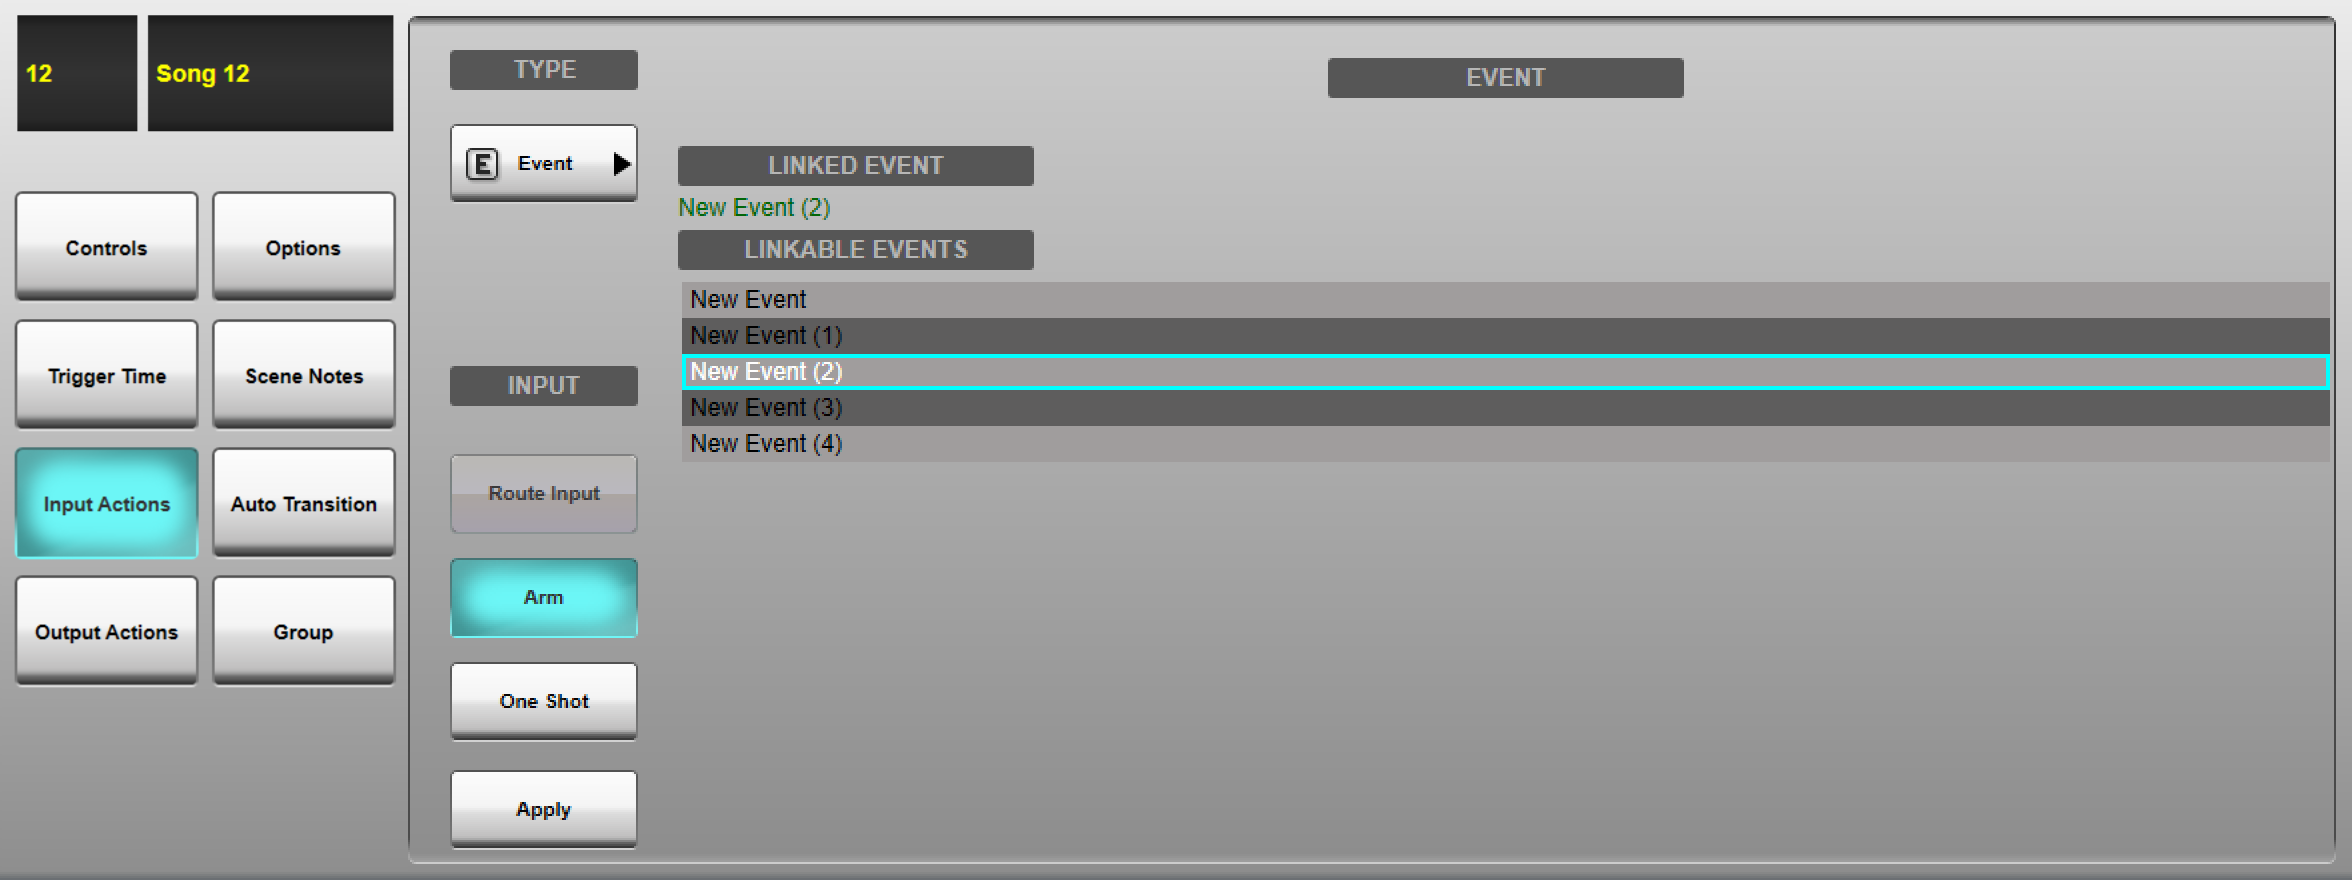
Arm the Output Action to ensure it triggers when the scene is fired.
The linked scene will be displayed in the Event Manager page.
GPI sources can be used to trigger events from the console's local GPIO ports* or from any SSL Live MADI or Network I/O Dante stagebox with GPIO ports.
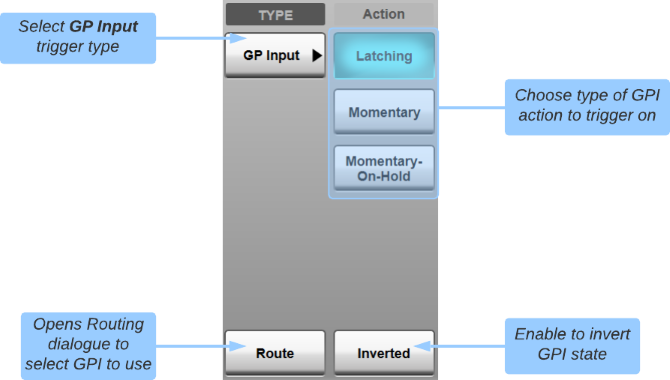
Select the GP Input source type then use the Route button to open a Routing dialogue listing all GPIs available to the console. Select the GPI to use and press Make. Close the Routing dialogue to return to the event source configuration.
GPIs can trigger based on a number of different Actions:
- Latching : Source state becomes and stays true when GPI signal goes high
- Momentary : Source state becomes true only while the GPI signal is high
- Momentary-On-Hold : Source state becomes true when GPI signal goes high and becomes false if GPI signal goes low after 500 milliseconds, else state remains true
Use the Inverted button to invert the GPI state into the event trigger, i.e. when the incoming GPI signal goes low, the source state should become true.
MIDI sources can be used to trigger events from the console's local MIDI ports*, from the MIDI port on any SSL Live MADI stagebox or via ipMIDI.
Select the MIDI Input source type then use the Route button to open a Routing dialogue listing all MIDI ports available to the console. Select the port to use and press Make. Close the Routing dialogue to return to the event source configuration.
Note: If a MIDI Input has already been routed to a MIDI port, subsequently added MIDI Inputs will be automatically routed to the last used MIDI port.Note On, Note Off, Program Change and Control Change (CC) messages can all be selected for use with events.
The remainder of the source section is used to configure the expected MIDI message (MIDI Channel, Note Number etc. as applicable).
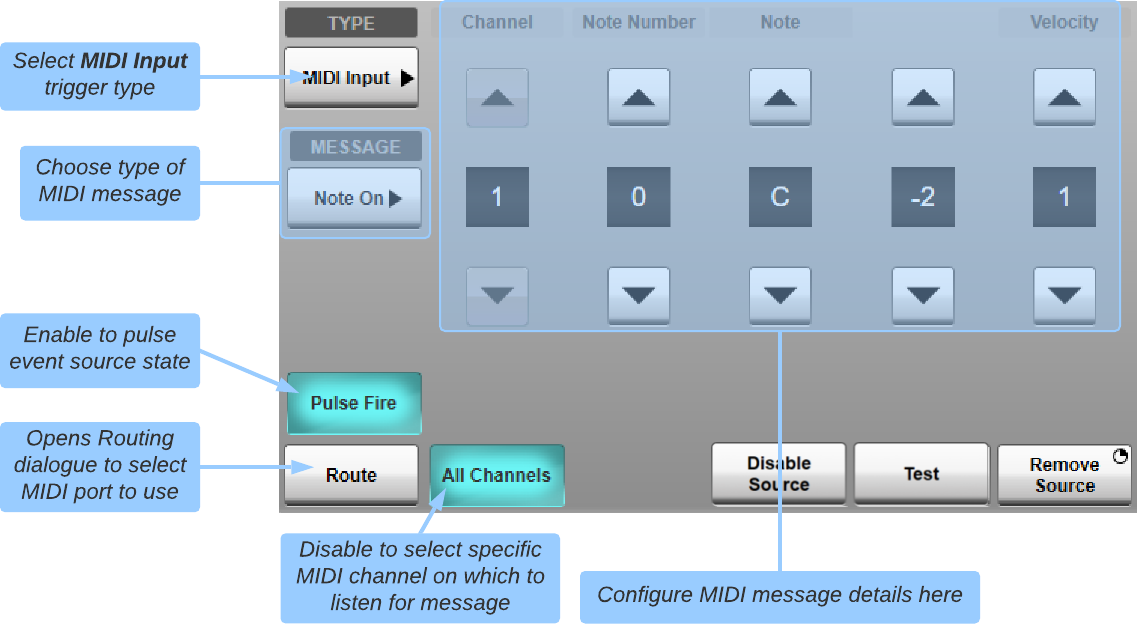
MIDI event sources have a Pulse Fire option. When enabled and a message of the specific type is received, the source state will go true for 500 ms then go false, irrespective of the input state. For program change messages this allows events to be retriggered by a repeated input. Without Pulse Fire enabled the event source state remains high following the program change.
Note: If using ipMIDI for Event sources this should be a different ipMIDI port to that used for Automation Input/Output Actions, DAW Control and Timecode.Various console functions can be used to trigger events. A full list is included below.
Path functions require the specific path number to be entered (or engage Any Path to trigger the event source when any paths of the selected type meet the desired state).

| Console Functions | Rehearse Mode | |||
|---|---|---|---|---|
| Mute Group Masters | MG Master 1-10 | |||
| Talkback Groups | Group 1 - 10 IN | |||
| Solo Setup | SIP | |||
| Additive Solo A / B | ||||
| Signal Switchers | Signal Switcher 1 - 4 | Input B | ||
| Path Functions |
Channel / Stem / Aux / Master / Matrix / Talkback / Solo Chan / VCA N |
Mute | ||
| Solo (not Solo paths) | ||||
| TB IN (Stem/Aux/Master paths only) | ||||
| Input A (Channel paths only) | ||||
| Input B (Channel paths only) | ||||
| Insert A IN (not VCA paths) | ||||
| Insert B IN (not VCA paths) | ||||
| Comp IN (processed paths only) | ||||
| Gate IN (processed paths only) | ||||
| EQ IN (processed paths only) | ||||
| Filters IN (processed paths only) | ||||
| Delay IN (processed paths only) | ||||
| All Pass IN (processed paths only) | ||||
| Routing (Channel/Stem/Aux/Talkback paths only) | Master / Stem / Aux IN | |||
| DAW | DAW 1 - 4 | Strip Master Switches | Select - Assign | Send A - E |
| Pan | ||||
| Mute | ||||
| Flip | ||||
| Global | Suspend | |||
| Rec/Rdy All | ||||
| Window | Transport | |||
| Edit | ||||
| Mix | ||||
| Alt | ||||
| Mem-Loc | ||||
| Master Section | Keyboard Shortcuts | Undo | ||
| Save | ||||
| Status/Group | Suspend | |||
| Transport Keys | On-Line | |||
| Loop | ||||
| Quick Punch | ||||
| Rewind | ||||
| Fast Forward | ||||
| Stop | ||||
| Play | ||||
| Rec | ||||
| Automation Write Enable | AE Plugin | |||
| AE Vol | ||||
| AE S Vol | ||||
| AE Pan | ||||
| AE Mute | ||||
| AE S Mute | ||||
| Master DAW | Master Section | Transport Keys | On-Line | |
| Loop | ||||
| Quick Punch | ||||
| Rewind | ||||
| Fast Forward | ||||
| Stop | ||||
| Play | ||||
| Rec | ||||
| Status Messages | Error Status (triggered by any error state, e.g. PSU failure) | |||
The console's User Keys can also be used to trigger events. Select the User Key source type then select the Action required to trigger the event.
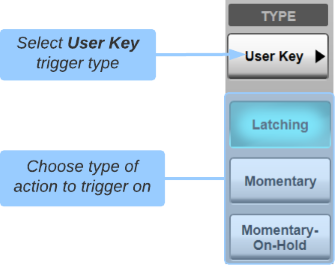
The different Actions available are:
- Latching : Source state becomes and stays true when User Key is pressed
- Momentary : Source state becomes true only while the User Key is pressed
- Momentary-On-Hold : Source state becomes true when User Key pressed and becomes false if User Key is released after 500 milliseconds, else state remains true
Only one User Key source can be added per event. The event's User Key source will now be available for assigning to any of the console's User Keys in the usual way, from the relevant User Options page (MENU > Setup > Options > USER KEYS).
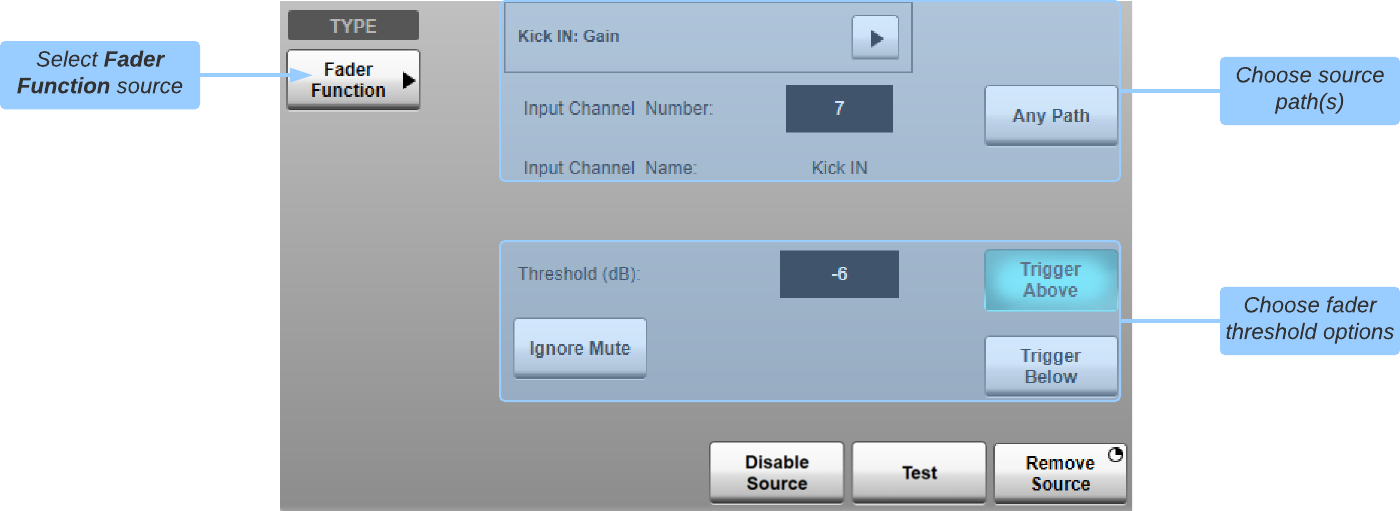
Fader Function sources can be used to trigger an event when a path's fader meets a specified dB Threshold.
Fader functions require the specific path number to be entered (or engage Any Path to trigger the event source when any paths of the selected type meet the desired state).
Once a path (or paths) have been selected, set the Threshold and determine if the source should Trigger Above or Trigger Below the threshold value.
 Note: Fader event sources act on the fader
position after any contributing VCA levels have been taken into
account.
Note: Fader event sources act on the fader
position after any contributing VCA levels have been taken into
account.e.g. If a path fader is at -6 dB and a VCA acting on that path is set to -10 dB, the value used to determine if the fader position is above or below the event threshold is -16 dB.
Event Destinations
Use the Add Destination button to add a new event destination. Up to 12 destinations can be added per event. All destination actions will be applied when the event's state becomes true.
Use the Remove Destination button to delete the selected destination from the event.
Note: Removing a destination cannot be undone; it must be re-added manually.
Use the Disable button to disable the selected destination from the event, without permanently deleting it. This allows certain destinations to be temporarily suspended from triggering without permanently losing their settings.
Use the Test button in the source area to test the event state going true (to test all configured destinations). Use the Test button in the destination area to test the selected destination.
When adding a new destination, use the TYPE option to the left of the destination area to choose the destination type. Destination options are:
|
|
None (unassigned) |
|
|
Automation Input |
|
|
GP Output (GPO) |
|
|
MIDI Output |
|
|
Console Function |
|
|
Fader Function |
Events can be used to trigger specific automation scenes. Follow the configuration steps below:
Select the Automation Input destination type in the Event Manager page.
This Automation event destination can now be linked to a scene's Input Action. From the console's Automation page, select the desired scene, go to the Input Actions section and select the Event action type.
Select the event from the list of LINKABLE EVENTS and press Apply.
Arm the Input Action to ensure it fires the scene when the event is activated.
The linked scene will be displayed in the Event Manager page.
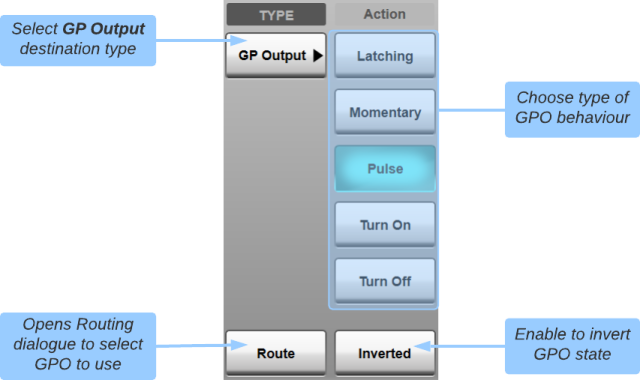
GPO destinations can be used to control external devices from the console's local GPIO ports* or from any SSL Live MADI or Network I/O Dante stagebox with GPIO ports.
Select the GP Output destination type then use the Route button to open a Routing dialogue listing all GPOs available to the console. Select the GPO to use and press Make. Close the Routing dialogue to return to the event destination configuration.
GPO behaviour can be set to a number of different Actions:
- Latching : GPO state toggled when event state becomes true
- Momentary : GPO state follows event state
- Pulse : GPO pulsed closed for 500 milliseconds when event state becomes true
- Turn On : GPO closed when event state becomes true; second event required to re-open GPO
- Turn Off : GPO opened when event state becomes true; second event required to re-close
Use the Inverted button to invert the GPO state relative to the event state, i.e. when the event state goes true, the GPO opens and vice versa.
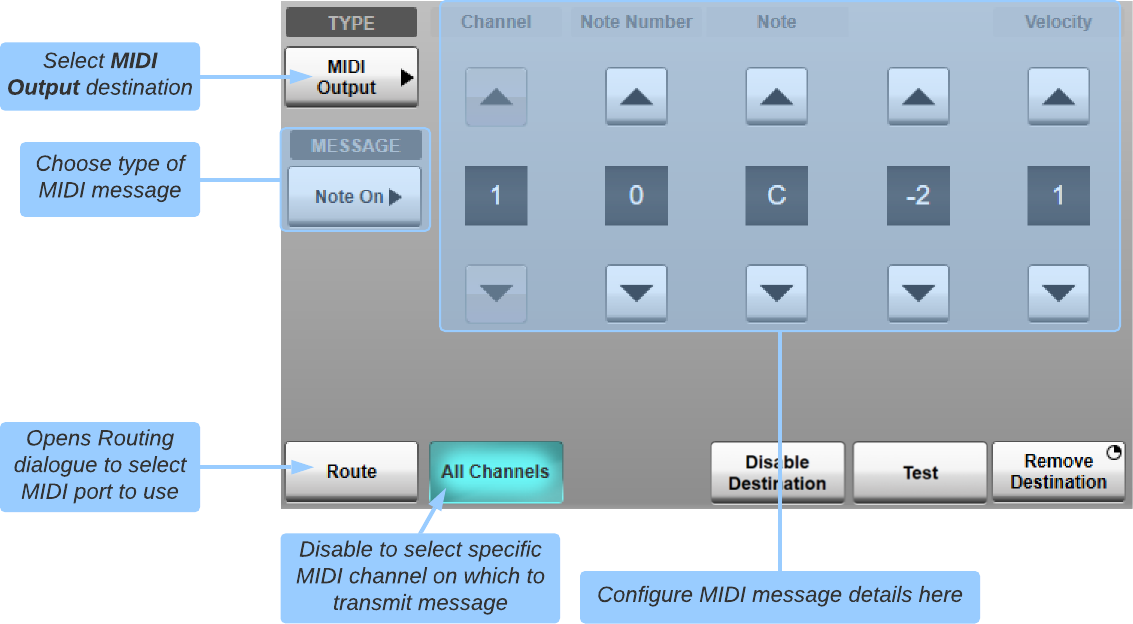
MIDI destinations can be used to control external devices from the console's local MIDI ports*, from the MIDI port on any SSL Live MADI stagebox or via ipMIDI.
Select the MIDI Output destination type then use the Route button to open a Routing dialogue listing all MIDI ports available to the console. Select the port to use and press Make. Close the Routing dialogue to return to the event destination configuration.
If a MIDI Output has already been routed to a MIDI port, subsequently added MIDI Outputs will be automatically routed to the last used MIDI port.
Note On, Note Off, Program Change and Control Change (CC) messages can all be selected for use with events.
The remainder of the destination section is used to configure the outgoing MIDI message (MIDI Channel, Note Number etc. as applicable).
 Note: If using
ipMIDI for Event
destinations this should be a different ipMIDI port to that used for
Automation Input/Output Actions,
DAW Control
and
Timecode.
Note: If using
ipMIDI for Event
destinations this should be a different ipMIDI port to that used for
Automation Input/Output Actions,
DAW Control
and
Timecode.
Various console functions can be actioned from events. A full list is included below.
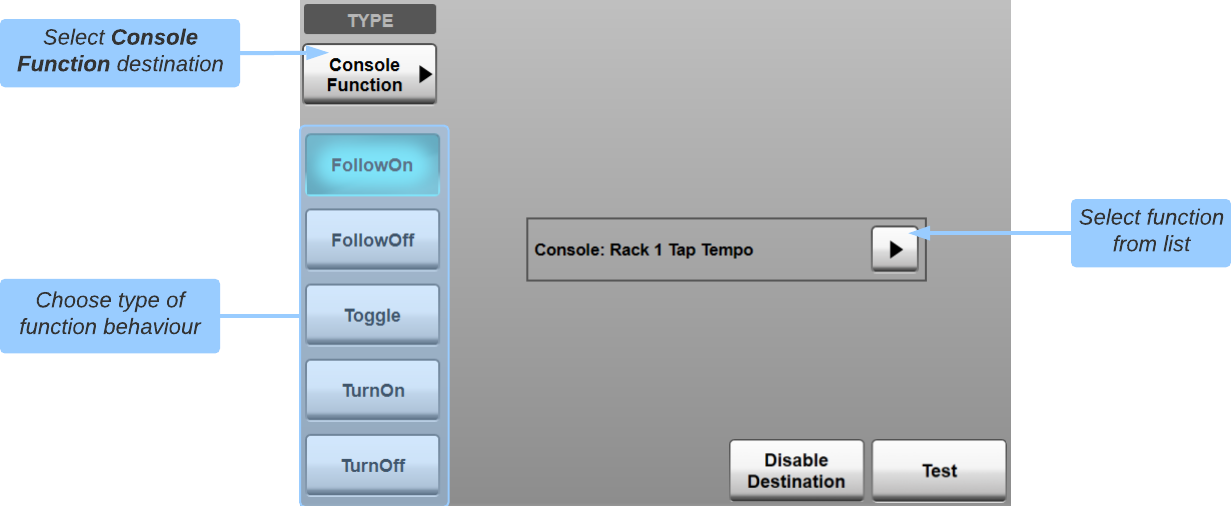
Console Functions can be set to operate in a number of different ways:
- Follow On : Function state follows event state
- Follow Off : Function state follows inverse of event state
- Toggle : Function state toggled whenever event state becomes true
- Turn On : Function turned on when event state becomes true; second event or direct function interaction required to turn the function off
- Turn Off : Function turned off when event state becomes true; second event or direct function interaction required to turn the function on
Path functions require the specific path number to be entered (or engage All Paths to affect all paths of the selected type).
| Console Functions | Rehearse Mode | Global | ||
|---|---|---|---|---|
| Group 1-8 | ||||
| Mute Group Masters | MG Master 1-10 | |||
| Talkback Groups | Group 1 - 10 IN | |||
| Tempo Link | Rack 1 - 6 Tap Tempo | |||
| Solo Setup | SIP | |||
| Additive Solo A / B | ||||
| Solo A Default Feed Point | None | |||
| Pre Fader | ||||
| Post All | ||||
| Toggle Pre/Post | ||||
| Solo B Default Feed Point | None | |||
| Pre Fader | ||||
| Post All | ||||
| Toggle Pre/Post | ||||
| Signal Switchers | Signal Switcher 1 - 4 | Input B | ||
| Save Showfile | ||||
| Automation | Fire Next / Previous | |||
| Save Scene | ||||
| Arm All Input Actions | ||||
| Disarm All Input Actions | ||||
| Arm All Output Actions | ||||
| Disarm All Output Actions | ||||
| Group State (Group Mode, Group All, Disabled) | ||||
| IO Functions | Recalibrate All Owned inputs across all connected Net I/O stageboxes | |||
| Auto Mute Safe | ||||
| Temporary Auto Mute Safe | ||||
| Path Functions |
Channel / Stem / Aux / Master / Matrix / Talkback / Solo Chan / VCA N |
Mute | ||
| Solo (not Solo paths) | ||||
| TB IN (Stem/Aux/Master paths only) | ||||
| Input A/B toggle (Channel paths only) | ||||
| Input B (Channel paths only) | ||||
| Insert A IN (not VCA paths) | ||||
| Insert B IN (not VCA paths) | ||||
| Comp IN (processed paths only) | ||||
| Gate IN (processed paths only) | ||||
| EQ IN (processed paths only) | ||||
| Filters IN (processed paths only) | ||||
| Delay IN (processed paths only) | ||||
| All Pass IN (processed paths only) | ||||
| Routing (Channel/Stem/Aux/Talkback paths only) | Master / Stem / Aux IN | |||
| DAW | DAW 1 - 4 | Strip Master Switches | Select - Assign | Send A - E |
| Pan | ||||
| Mute | ||||
| Flip | ||||
| Global | Suspend | |||
| Rec/Rdy All | ||||
| Fader Banks | Bank Down / Up | |||
| Channel Down / Up | ||||
| Window | Transport | |||
| Edit | ||||
| Mix | ||||
| Alt | ||||
| Mem-Loc | ||||
| Master Section | Keyboard Shortcuts | Undo | ||
| Save | ||||
| Function Keys | F1 | |||
| F8/ESC | ||||
| Status/Group | Suspend | |||
| Transport Keys | RTZ | |||
| END | ||||
| On-Line | ||||
| Loop | ||||
| Quick Punch | ||||
| Rewind | ||||
| Fast Forward | ||||
| Stop | ||||
| Play | ||||
| Rec | ||||
| < | ||||
| > | ||||
| Automation Write Enable | AE Plugin | |||
| AE Vol | ||||
| AE S Vol | ||||
| AE Pan | ||||
| AE Mute | ||||
| AE S Mute | ||||
| Keypad | + / - | |||
| Misc | Foot Switch Stop/Play | |||
| Foot Switch Record | ||||
| SSL Nested Functions | Prev / Next | |||
| Goto Marker 1 | ||||
| Master DAW | Master Section | Transport Keys | RTZ | |
| END | ||||
| On-Line | ||||
| Loop | ||||
| Quick Punch | ||||
| Rewind | ||||
| Fast Forward | ||||
| Stop | ||||
| Play | ||||
| Rec | ||||
| < | ||||
| > | ||||
| SSL Nested Functions | Prev / Next | |||
| Goto Marker 1 | ||||
Events can be used to set path faders to a specified level using the Fader Function event destination.
Fader functions require the specific path number to be entered (or engage All Paths to affect all paths of the selected type).
Once a path (or paths) have been selected, set the desired dB value for the path(s).
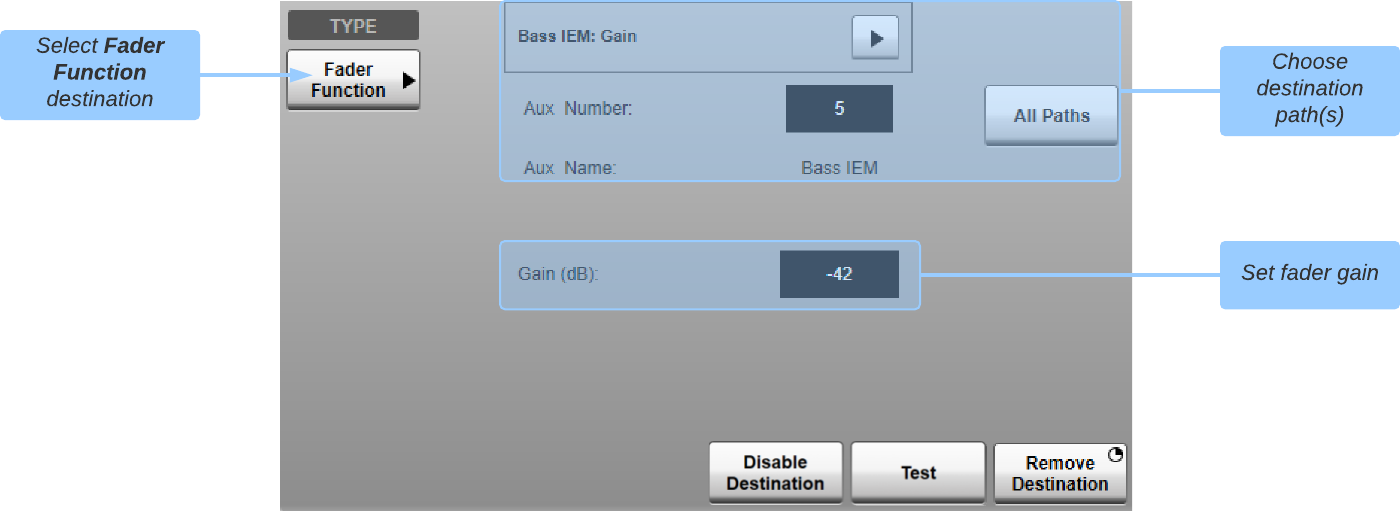 Note: Fader event destinations set the
fader position before any contributing VCA levels have been taken
into account.
Note: Fader event destinations set the
fader position before any contributing VCA levels have been taken
into account.e.g. If a path fader is set to -6 dB by the event and a VCA acting on that path is set to -10 dB, the overall fader gain will be -16 dB.
* L100 does not have local GPIO or MIDI ports; only Events using ipMIDI
or remote stagebox GPIO and MIDI can be configured on L100.
