Clocking & Sync
The console and stageboxes must all share a common digital clock sync reference.
Live's internal clock should generally be used to clock a system of console(s) and stageboxes. No external clock is needed unless a specific application requires it. Any external clock must match the sample rate at which the Live console is running (or PAL 25/NTSC 29.97 video).
Note: If an external clock is used, we recommend that only the console be connected to the clock source and the stageboxes clocked from the console's MADI or Blacklight streams. If the external clock source is lost, the console will revert to the next available clock source (e.g. its internal clock) and the rest of the system will remain in sync. We therefore do not recommend connecting external clocks to each of the individual stageboxes as each unit will free run independently without a common sync source.
System Examples
The links below provide connection examples for common configurations. The rest of this page describes the clocking functionality available in further detail.
Clock Source
The console may be clocked internally, or externally via video, AES, wordclock, MADI, Blacklight II (in a dual SSL console system) or Dante.
This is chosen in Menu > Setup > Options > SYSTEM tab.
Main and Backup clock sources can be configured. If the Main clock source is lost, the console will automatically switch to the Backup clock source. If the Backup source is lost, the console will revert to its internal clock.
Use the arrow buttons to open the Main or Backup selection menus. Select the required clock source then press & hold the APPLY button.
Ensure that the Current source matches the expected clock source.
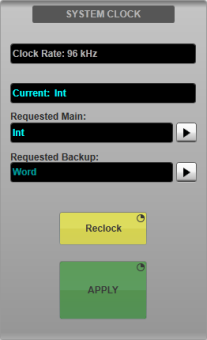
If the requested clock source is lost, ensure the clock source is restored then use the Reclock button to attempt reclocking to the Main/Backup source.
The status bar at the top of the main screen will show a clock source change message to warn the operator. A status bar icon also indicates if the clock has deviated from the defined Main clock source:
 |
Orange: Main clock source lost. Running on Backup clock source.
|
 |
Red: Main and Backup clock sources lost. Running on internal clock.
|
Two consoles may be connected to a Blacklight II Concentrator for sharing a set of stageboxes.
The 'Master' console (designated as such by connecting to the Blacklight Concentrator's A ports) will distribute its clock to the Blacklight system
and any stageboxes and consoles connected to it. The 'Slave' console (designated by connecting to the Blacklight Concentrator's B ports)
should therefore set its clock source to the corresponding BLII port on the rear of the console.
The Master console should distribute either its internal clock over Blacklight, or one of the external clock source options listed above,
with the exception of any Blacklight port of which it is the Master.
Selecting the BLII clock source button will reveal a subset of buttons.
The Slave console should use the Blacklight II option.
However, the Master console may use one of the MADI options if an external MADI source is connected
to the corresponding MADI input on the Blacklight Concentrator. For example, this could be a MADI feed from a third party device providing clock,
or an SSL stagebox fed with a wordclock signal and set to clock from its external wordclock input. (Note that wordclock cannot be connected directly to a BLII Concentrator's MADI ports.)
Dante uses its own Clock Election process to determine the most appropriate Leader Clock for the Dante network and a Leader Clock will be chosen automatically.
For more information on the Dante Clock Election process please see the Audinate website: dev.audinate.com/GA/dante-controller/userguide/webhelp/#clock_synchronization.htm.
To choose a Leader Clock manually, set this device to be the Preferred Leader.
To do this, open Dante Controller and click on the Clock Status tab.
Check the Preferred Leader checkbox for your chosen Leader Clock.
If multiple devices on the network are Preferred Leaders, the Dante Clock Election process will automatically choose a Leader Clock from the multiple Preferred Leaders.
If the Leader Clock device's status changes, or a more suitable Leader Clock comes online, the Dante network will go through the Clock Election steps again to determine the most suitable Leader Clock for the network.
If you are not using Dante network redundancy, please use the primary connection (rather than the secondary) to ensure accurate synchronisation.
SSL Recommends: SSL recommends that the console is set to clock from the Dante network (slave mode) to benefit from the Dante clock election process.
Setting up the Console as a Slave of the Dante Network
In this configuration, a Dante device other than the console is the Leader Clock. The console and all other devices on the network will clock to this Leader.
In Dante Controller, go to the Clock Status tab.
Check the Preferred Leader checkbox for the Leader Clock device(s) if you wish to set one.
Dante has its own clock election process, so it is not necessary to set a Preferred Leader.
For this example, ensure that Preferred Leader and Sync to External are unchecked for all other devices on the network
(including the console's Dante Expander and BLII/X-Light Bridge as applicable).
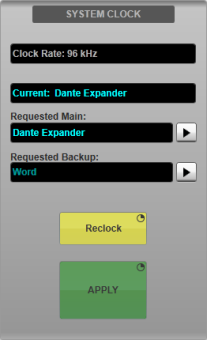
On the console, go to MENU > Setup > Options > SYSTEM tab.
In the SYSTEM CLOCK section, select Dante Expander as the Main clock source and press & hold APPLY.
Ensure that the Current clock source field displays Dante Expander.
The chosen Preferred Leader (if set) is now the Leader Clock of the network, including the console.
The console is now clocking from its Dante Expander module. The Dante Expander module is clocking from the Preferred Leader on the Dante network.
All other devices on the network are clocking from the Preferred Leader on the Dante network.
Notes:
If selecting Dante as a clock source on the console,
the console clock backup scheme will not drop back to another clock source if the Dante network clock is lost.
The Dante Expander module incorporates an internal clock which will become the Leader Clock of the Dante network as determined by Dante's clock election process
until another device on the network is identified as a more suitable Leader Clock.
Important:
It is not recommended to clock the console from Dante if the Dante SRC In is engaged.
Consoles clocked from stageboxes via MADI or Wordclock are not recommended to be used as Dante network Leader Clock sources.
Setting Up the Console as Leader Clock of the Network
In this configuration the console is the Leader Clock of the network and all other devices on the network will clock to the console.
To set this up, on the console, go to MENU > Setup > Options > SYSTEM tab.
In the SYSTEM CLOCK section select Int (the console's internal clock) as the Main clock source and press & hold APPLY.
Ensure that the Current clock source field displays Int.
In Dante Controller go to the Clock Status tab.
Check the Preferred Leader and Enable Sync To External checkboxes for the console's Dante Expander.
Ensure that Preferred Leader and Sync to External are unchecked for all other devices on the network.
The console's internal clock is now the Leader Clock of the Dante network. The console's Dante Expander module is clocking from the console's internal clock, and all other devices on the network are following the clock from the Dante Expander.
Important:
Due to Dante's clock election process, any device subsequently connecting to the network which is also set to Preferred Leader and has a lower MAC address than the console will be elevated to network Leader Clock.
In this scenario the console and Dante network clocks will no longer be in sync and could cause loss of audio. SSL therefore recommends that this configuration is not used as it does not offer network clock redundancy.
Important: As detailed in the previous section, SSL recommends that the console is set to clock from the Dante network (slave mode) to benefit from the Dante clock election process.
This should be done using the local Dante Expander port as described above, even if using a BLII/X-Light Bridge.
Provided both the console and BLII/X-Light Bridge remain clocked to the Dante network they will remain synchronous.
Setting up the Console as a Slave of the Dante Network
For the most reliable clocking scheme, SSL recommends that the console is set to be a slave of the Dante network when using a BLII or X-Light Bridge.
In this configuration, both the BLII/X-Light Bridge and console (via the local Dante Expander) are set to clock from the Dante Network.
Refer to the previous section to configure the console to clock from its local Dante Expander.
The BLII/X-Light Bridge must also be configured so that it clocks from the Dante network.
Ensure that its Preferred Leader and Enable Sync To External
checkboxes in Dante Controller's Clock Status tab are not checked.
This ensures that the BLII/X-Light Bridge is not being clocked from the console and that it is set to receive clock from the Dante network.
If configured correctly the following LEDs will be seen on the BLII/X-Light Bridge:
| BLII Bridge LED |
X-Light Bridge LED |
LED Meaning |
If configured correctly will light |
| BL S |
XL S |
Receiving sync (clock) from console via BLII/X-Light connection |
Off |
| SRC |
Not currently used |
Off |
| NET S |
Receiving sync (clock) from network |
Solid Green |
| GM |
N/A |
Device elected as network Grand Master (Leader Clock) |
Off |
(The GM LED is located to the right of the Dante ports on the front of the BLII Bridge.)
If no Sync LEDs lit
If the system has been configured correctly as above but both the BL S/XL S and NET S sync LEDs are off then the
BLII/X-Light Bridge has likely been elected Leader clock of the network (i.e. no other Preferred Leaders were found on the network). This is a valid clocking scheme.
The BLII/X-Light Bridge will clock the network from its internal clock and in turn the console will clock from the network. The BLII Bridge's GM LED will light in this scenario.
The Clock Status page in Dante Controller will indicate the currently elected Leader clock.
If the LED states differ from the above please consult the full tables in Working with a Dante Bridge.
Setting the Sample Rate
The Live system can run at 96 kHz (recommended) or 48 kHz sample rates. Use the 96 kHz and 48 kHz buttons in the System page
(MENU > Setup > System / Power > System tab) to change the console's sample rate. The stageboxes must also be changed to match the console's sample rate; see below.
Aside from the FX Loop and optional Dante module interfaces, decreasing the sample rate to 48 kHz does not increase the total input/output count; each MADI port carries 64 channels at 48 kHz but odd-even MADI port pairs are always redundant (even-numbered ports on twin card Blacklight Concentrator are disabled).
Important: Changing the console's sample rate will interrupt audio and cause routes to be dropped as stagebox configurations will need to be changed. Muting all outputs to switch sample rate and for a further 30 seconds is recommended.
Important: The console must be rebooted following a change in Sample Rate.
MADI Stageboxes
By default stageboxes are set to clock from the incoming MADI stream. This is the recommended setting. Other stagebox clock sync options are internal or external wordclock.
The clock source and sample rate can be set from the physical setup controls on the rear of each stagebox. The current clock source is displayed to the right of the SETUP area: if neither clock LED is lit, the stagebox is running on its own internal clock.
Note: The wordclock output transmits the clock signal currently in use by the stagebox (i.e. it is not a loop through), depending on the stagebox's clock source setting).
To change the clock source, press & hold REMOTE and CLOCK simultaneously until the padlock flashes green. Press CLOCK until MADI is lit. The colour shows the following:
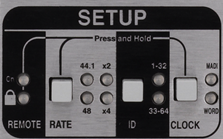
- Red: no MADI from master console detected.
- Red/green flashing: a single master MADI port is locked (non-redundant cabling).
- Green: both master MADI ports 1 & 2 are locked (redundant cabling).
To change the sample rate of the stagebox, unlock the controls as described above then use the RATE button to cycle through the available options.
Note: Only 48 x1 and 48 x2 (96 kHz) clock rates are currently supported.
Stageboxes running at 48 kHz sample rate can be daisy-chained on a single MADI stream, allowing all 64 channels of the MADI protocol to be utilised. With the controls unlocked, use the ID button to toggle between channels 1-32 and 33-64.
- Connect the MADI Out from the console or Blacklight Concentrator to the MADI In of the first stagebox (ID 1-32).
- Connect the MADI Out from the first stagebox to the MADI In of the second stagebox (ID 33-64).
- Connect the MADI Out from the second stagebox to the MADI In of the console or Blacklight Concentrator.
- Repeat the above steps for the second set of MADI ports if connecting redundantly.
Refer to the System Examples section below for further information.
Note: If running at 96 kHz sample rate (48 x2), the ID field must be set to 1-32.
The controls will return to their locked state after a few seconds.
AES/EBU
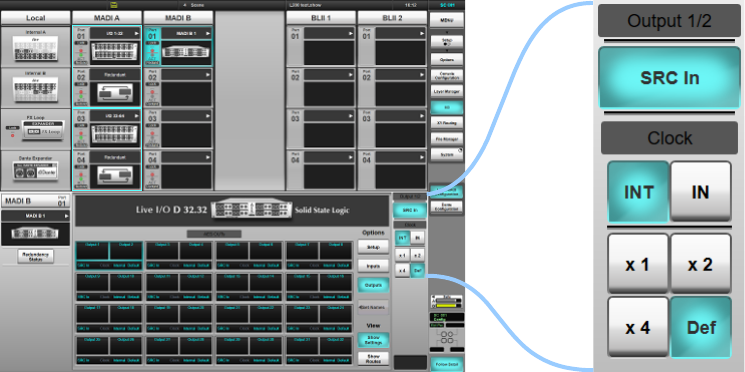
All AES/EBU ports have sample rate converters (SRCs) available. These are enabled by default via the console's I/O menu (MENU > Setup > I/O).
Select the local I/O or D32.32 stagebox in the I/O page and select the specific AES/EBU input or output you wish to sample rate convert from the lower section of the screen.
For inputs, you will be presented with a SRC In button for the selected port. The console supports the input rates listed in the input Fs column in the table below and will convert the incoming audio to 96 kHz (or 48 kHz).
The table below shows sample rates available for AES/EBU outputs. There are additional controls for AES outputs, as shown above.
Note: The multiplier controls (x1, x2 and x4) are relative to a base sample rate of 44.1 or 48k, not the operating rate of the console (48 or 96k).
Engaging SRC In and setting the output clock to In will clock the AES output from the corresponding AES input, at 1, 2, or 4 times the base rate (44.1 or 48k).
Setting the output clock to Int will use the console as the clock source. This can also be set to x1, x2, or x4 of this base sample rate (48k).
Tip: Setting the output SRC to In will set this AES port's output to clock from the corresponding input rather than the console clock. This is useful if the external device has issues clocking to an external clock. This setting will allow the external device to use its internal clock, with the Live console's AES SRC locked to the external device, allowing the device to clock itself thus avoiding clocking errors.
For example, if using a 96 kHz reverb, set it to internal clock and set the console's SRC settings to SRC In for both input and output AES/EBU ports. For the output port, select In and x2 (for 96k).
Useful Links
Local/MADI I/O Configuration
Setting Up Dante
Installation Guide
Index and Glossary

