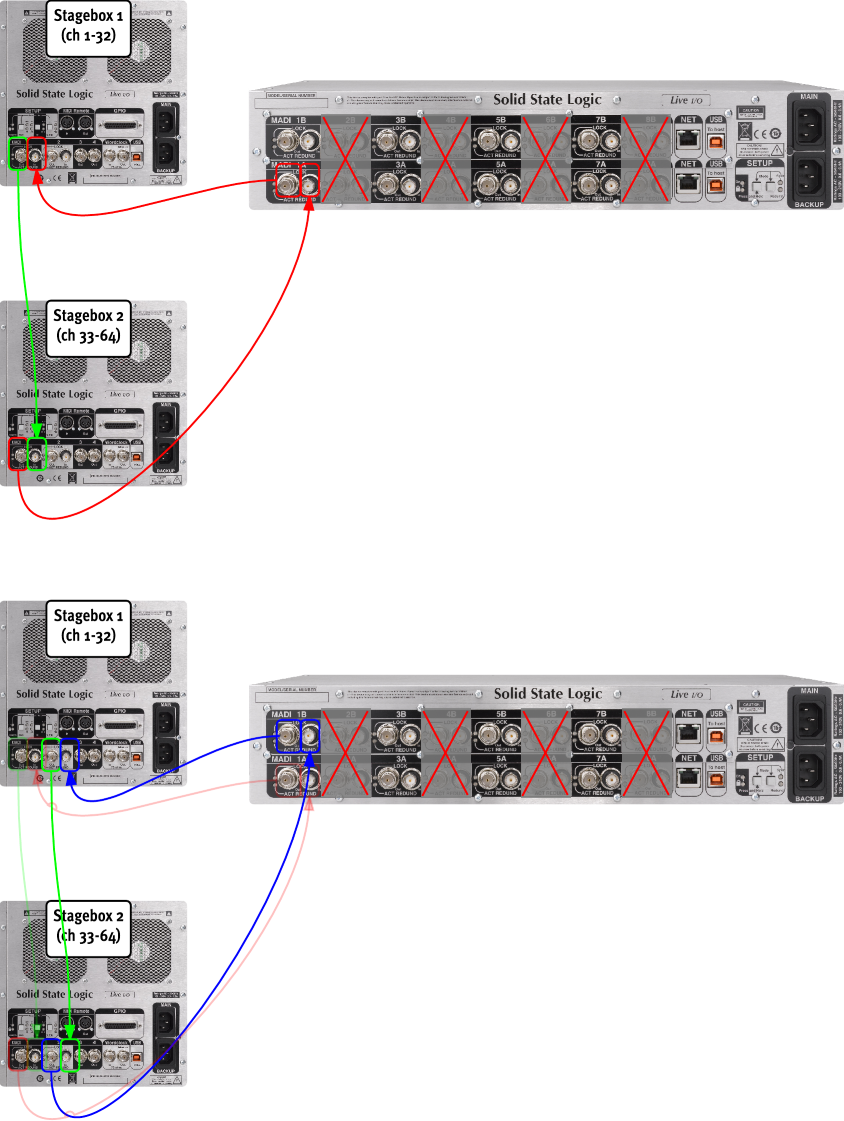
System Example G: Daisy-chained stageboxes for 48 kHz operation
Each pair of MADI ports on SSL Live is capable of transporting 64 channels redundantly at 48 kHz. Since each SSL MADI stagebox consists of 32 channels, up to two stageboxes can be 'daisy-chained' using the instructions below if more stageboxes are required than there are pairs of MADI ports available.
For smaller configurations SSL recommend following System Example D or System Example E, for single and dual console systems respectively. At 48k operation, only the odd numbered MADI ports of a BLII Concentrator can be used.
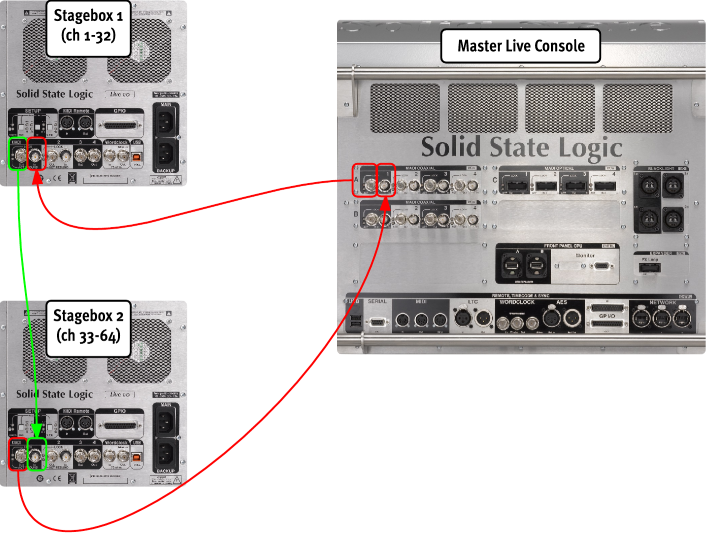
Please Note: It is not possible to use the MIDI connection on the second stagebox in the daisy chain. If a MIDI connection is required at the stagebox end, please use the MIDI connection on the first stagebox.- Set the Live console's clock source and sample rate as described in the earlier System pages.
- Using 75 Ω BNC coax cables throughout (max 75 m, conforming to spec defined in the Installation Guide), connect MADI port 1 In from the first stagebox to the console's MADI Out port.
- Connect MADI port 1 Out from the first stagebox to the 1 In MADI port on the second stagebox.
-
Connect MADI port 1 Out from the second stagebox to the console's MADI In port.
-
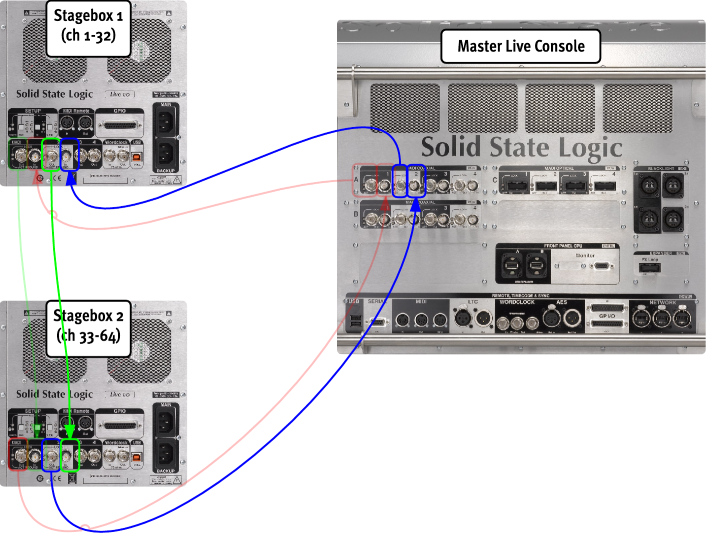
At 48 kHz sample rate, the console MADI ports always operate in odd-even redundant pairs, although the stageboxes can be connected non-redundantly if desired.
If a redundant MADI connection is required, ensure that the MADI ports 1 In on the first stagebox and 1 Out on the second stagebox described above are connected to an odd numbered MADI port on the console.
Next, connect MADI port 2 In of the first stagebox and 2 Out of the second stagebox to the next MADI port on the console (e.g. stagebox ports 1 & 2 to console ports A1 & A2 respectively).
Finally, daisy-chain the two stageboxes by connecting MADI port 2 Out from the first stagebox to 2 In of the second stagebox.
-
Each stagebox must be configured to run at 48 kHz sample rate, in addition to the console. Press & hold the REMOTE and CLOCK buttons on the back of the first stagebox until the padlock symbol on the left flashes green.
Press the RATE button until the 48 LED is lit (the other three RATE LEDs should be off). Press the ID button until the 1-32 LED is lit.
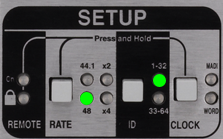
-
Repeat the process for the second stagebox, this time setting the RATE to 48 and ID to 33-64.
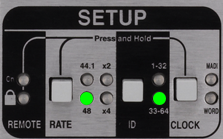
-
If connecting to an 8-port Blacklight Concentrator, follow the steps above, connecting redundant connections to odd-even port numbers.
If connecting to a 16-port Blacklight Concentrator, all even ports will be disabled. Connect the two stageboxes together as above (MADI ports 1 Out and 2 Out on the first stagebox to ports 1 In and 2 In on the second stagebox respectively), then connect the remaining In/Out ports to a pair of A and B ports on the Blacklight Concentrator.
System Examples
Setup: Clocking - System Example A: Connecting stageboxes to a Live console via MADISetup: Clocking - System Example B: Clocking the Live console from an external source
Setup: Clocking - System Example C: Connecting stageboxes to two Live consoles via MADI
Setup: Clocking - System Example D: Connecting stageboxes to a Live console over Blacklight II
Setup: Clocking - System Example E: Connecting stageboxes to two Live consoles over Blacklight II
Setup: Clocking - System Example F: Connecting stageboxes to three Live consoles
Setup: Clocking - System Example G: Daisy-chained stageboxes for 48 kHz operation
Useful Links
ClockingIndex and Glossary