
Presets
All of the channel settings found in the Detail Dialogue can be saved and recalled using Presets; these Presets can cover the entire channel or smaller segments of it.
To open the Preset list for any area of the console, open the Detail dialogue to the appropriate page and touch the Preset button towards the bottom right corner. The Preset list will open within the Detail dialogue:
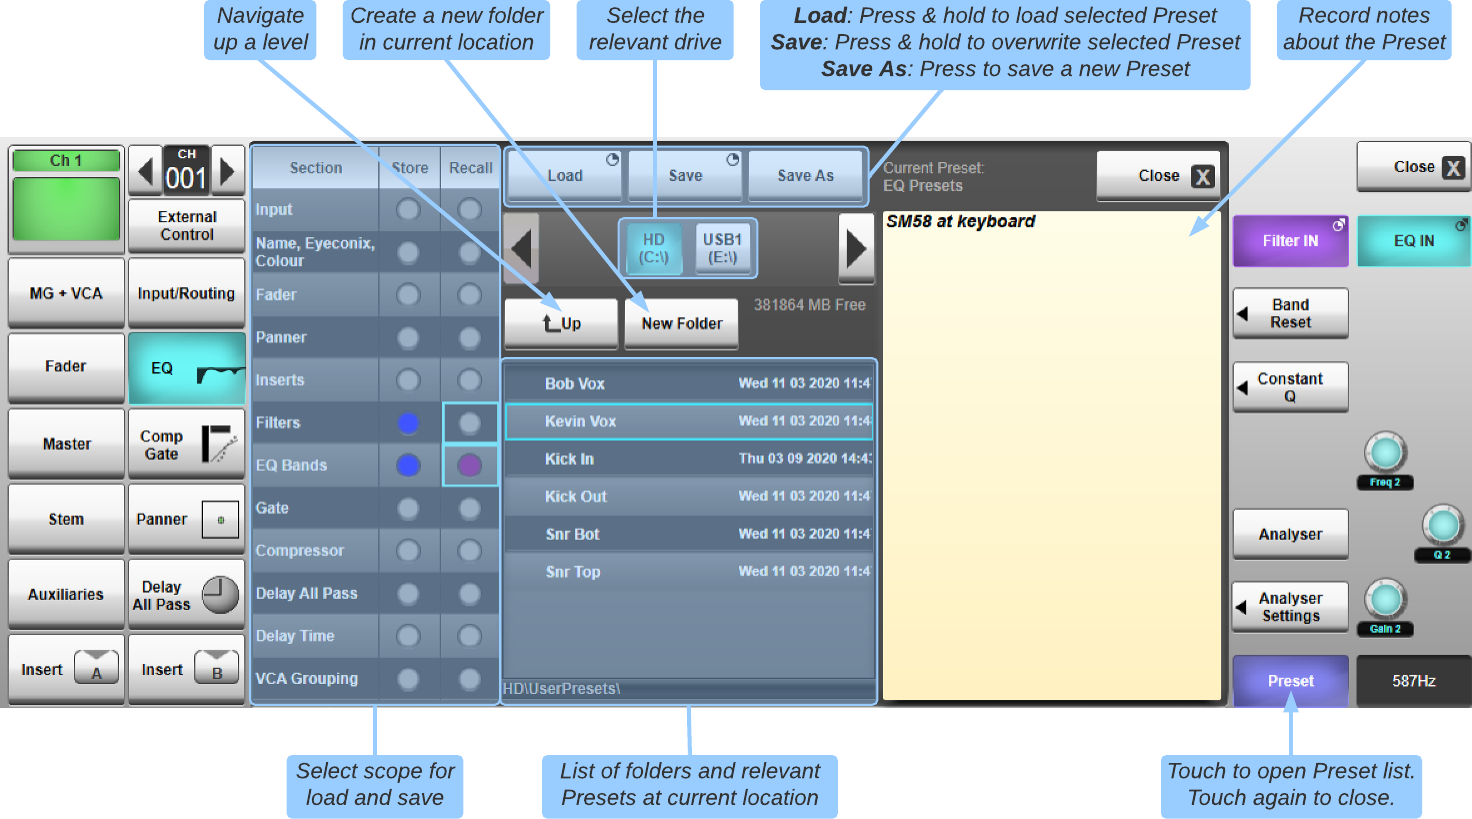
When accessing the Presets dialogue from a processing page (e.g. EQ/Filters, Panner etc.) only that section of the path can be stored/recalled from the Preset file. The Presets dialogue accessed from the Path Eyeconix/Config page can be used to store and recall multiple processing sections from a single Preset file.
Use the Store Section column to select the scope of what is saved to Preset files (engage the blue dots to enable storing). To overwrite an existing preset, choose the scope then press & hold the Save button. To save a new Preset file, press the Save As button and enter a filename.
Note: Saving processing sections to an existing Preset file is an additive process. e.g. if an existing file contains Gate settings and the Preset Store scope is set to Compressor, the previously saved Gate settings will remain in the file when the Compressor settings are saved.Use the Recall Section column to select the scope of what is loaded from a selected Preset file (engage the purple dots to enable recall). The cyan boxes in the Recall column indicate the sections stored and available for recall from the selected file. Only sections present in the file and with recall enabled (i.e. cyan box and purple dot enabled) will be loaded. Press & hold the Load button to load the selected section(s) from the Preset file.
Tip: Use the Store and Recall column headings in the Path Eyeconix/Config Preset page to toggle selection of all store/recall scope sections. Note: Once created, folders can only be renamed from the Main Preset List, described below.Preset Notes
Any pertinent details about a Preset can be typed into the Notes display, to the right of the Preset list.
To type notes, navigate to the Preset and Select it so that it has a cyan surround.
Double-tap inside the notes display, then type the notes using the keyboard which appears, and touch OK.
These notes will appear in the notes display whenever that Preset is highlighted in the Preset list.
Press Preset again to close the Preset list.
Old Preset Files: Note that Presets saved in V4.10 software and earlier are stored in a different format to V4.11 Presets. Old Preset files will be automatically converted to the new format when their containing folder is opened in console or SOLSA software.Main Preset List
You can also view and manage a complete list of the console's Presets by opening the main Preset List, accessed via the Setup menu: MENU > Setup > File Manager > Presets tab
This display functions in a very similar way to the Showfiles display, with the main exception being the absence of SSL Templates. Note also that files are displayed with their full extensions. The 'user' name given to Presets appears as the first part of the Preset filename. The next section of the filename is the type of channel that the Preset was saved from. The third part is the type of Preset (EQ bands, compressor, entire channel path etc.).
Edit Mode
As with Showfiles, a number of folder actions are only available when the Preset list is in Edit mode.
To activate Edit mode, touch the Edit button in the top-centre of the Main Preset List screen. The button will 'light' and a second navigation pane will appear in the right side of the screen.
To select a Preset to be edited using any of the edit actions listed between the panes, navigate to it in the left navigation pane and touch the circle at the end of its list entry – the circle will go red to indicate that the Preset is Edit Enabled.
You can select multiple Preset and multiple folders. You can also select all Presets and folders in the current location by touching the All circle at the top of the list.
Remember: Edit mode functions always act on the Presets which are Edit Enabled, and not on Presets which are highlighted (displayed with a cyan surround).Moving and Copying Presets
To move or copy files and folders, navigate to the source folder in the left pane, and the destination folder in the right navigation pane;
In the left navigation pane, Edit Enable the items to be moved or copied;
Now press the Move or Copy button in between the two panes. The items will be moved or copied to the new location.
Note: Items cannot be copied into their current location.Making Presets Read-Only
You can make Presets read-only in order to prevent them from being overwritten via the Save function.
To select the Presets to be made Read-Only, navigate to them in the left navigation pane and Edit Enable them.
Now press the Read Only button in between the two panes. A padlock symbol will appear before the file names.
To undo a file's Read Only status, simply repeat this procedure.
Renaming Presets and Folders
To rename a file or folder, navigate to it in the left navigation pane and Edit Enable it.
Now press the Rename button between the panes, rename the Preset using the keyboard which appears, and touch OK.
Note: The renaming function only allows you to change the 'user' part of the filename.Deleting Presets and Folders
To delete Presets or folders, navigate to them in the left navigation pane and Edit Enable them.
Now press & hold the Delete button between the panes.
Note: Folders must be empty before they can be deleted. Presets with Read Only protection cannot be deleted.Useful Links:
ShowfilesIndex and Glossary
