The following pages contain instructions on setting up SSL Live consoles for use with a Dante network, routing to and from Dante devices and controlling and gain sharing with SSL Net I/O Stageboxes:
There are two methods available for Dante routing on SSL Live consoles: Dual Domain Routes and Virtual Tie Lines.
Dual Domain Routes
Dual Domain Routes are unique to SSL, allowing the console to interact directly with devices on the network, with no need to use Dante Controller to make routes.
When using Dual Domain Routes, Dante devices will appear in the console's routing view.
Dual Domain Routes are used for most routing situations. Dual Domain Routes from SSL Net I/O stageboxes to Channel inputs also provide gain control as well as control over other stagebox parameters (e.g. +48V).
As with normal Dante routes, by default Dual Domain Routes are created using unicast flows.
If multicast flows are desired, these must be set up in Dante Controller in the usual way. Any existing Dual Domain Routes using those transmit channels will be converted to multicast and any Dual Domain Routes subsequently created from those transmit channels will be multicast.
Please Note:
Dual Domain Routes should not be used for routing between multiple SSL consoles.
Use Virtual Tie Lines for this purpose (see below).
This is because when SSL consoles make a Dual Domain Route from the console, the console is not deterministic when choosing a Dante output to route from, or a Dante input on the other device to route to.
This route will be created in any of the available routing points.
If the other device is an SSL console, this non-deterministic approach means the receiving console is not aware of which input has been routed to (and vice versa).
Devices must be configured in the Dante Configuration page before Dual Domain Routes can be made. The Dante Configuration page is the console's Dante I/O Setup page.
Dual Domain Routes can be made through the Dante Expander Module or a BLII/X-Light Bridge.
For more information on Dual Domain Routes and configuring Dante devices please see Dante Dual Domain Routes.
Virtual Tie Lines
Using Virtual Tie Lines allows SSL Live consoles to be used as a typical Dante I/O device.
Once created, Local Virtual Tie Lines will appear in the routing view as a local I/O type.
When routing to a Virtual Tie Line, only the internal route in the console is made - connecting a path to the Dante Expander Module.
The network route (connecting the Dante Expander Module to another Dante device on the network) must be made manually from Dante Controller.
Virtual Tie Lines should be used for routing between multiple SSL consoles, for live recording and rehearse mode.
Virtual Tie Lines do not carry control data, and therefore should not be used for routes from Net I/O stagebox inputs to the console unless control is not required.
The Dante Expander Module's I/O does not contain any Virtual Tie Lines by default, they must be created.
Virtual Tie Lines can be made through the Dante Expander Module or a BLII/X-Light Bridge.
Creating Virtual Tie Lines
Dante transmit/receive channels on the console's Dante Expander or BLII/X-Light Bridge allocated as Virtual Tie Lines appear at the beginning of that device's I/O capacity. The capacity reserved for Virtual Tie Lines is deducted from the dual domain routing capacity that the console uses to automatically make routes directly to other Dante devices.
Please Note:
Virtual Tie Lines should be configured before any other Dante routing is done.
If connected to a BLII/X-Light Bridge, the console may use either the BLII/X-Light Bridge or Dante Expander module I/O resources to create dual domain routes and cannot switch routes from one to another once routes have been made.
Failure to configure Virtual Tie Lines before making dual domain routes may result in the I/O resources being used up by dual domain routes, leaving not enough resources for the Virtual Tie Line quantity desired on the BLII/X-Light Bridge or Dante Expander.
Through the Dante Expander Module
To create Virtual Tie Lines go to MENU > Setup > I/O > Local/MADI Configuration
then tap on the Dante Expander Module to bring up its Detail View.
Double tap on the Virtual Tie Lines label area and select the number of Virtual Tie Lines you require. This will create the same number of inputs and outputs.
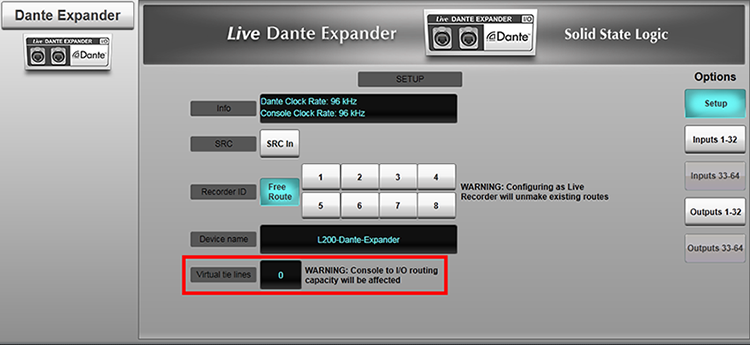
Up to 32 Virtual Tie Lines can be created at 96 kHz or up to 64 at 48 kHz.
Through a BLII/X-Light Bridge
To set up Virtual Tie Lines on a BLII/X-Light Bridge, go to MENU > Setup > I/O > Local/MADI Configuration.
Tap on the top of the BLII/X-Light port column corresponding to the local port that the BLII/X-Light Bridge is connected to.
The Detail View for the BLII/X-Light Bridge will now appear. On the BLII/X-Light Bridge it is possible to create Virtual Tie Line Inputs and Outputs separately.
Double tap on the Virtual Tie Line Inputs or Outputs text fields to change the quantity of Virtual Tie Lines.
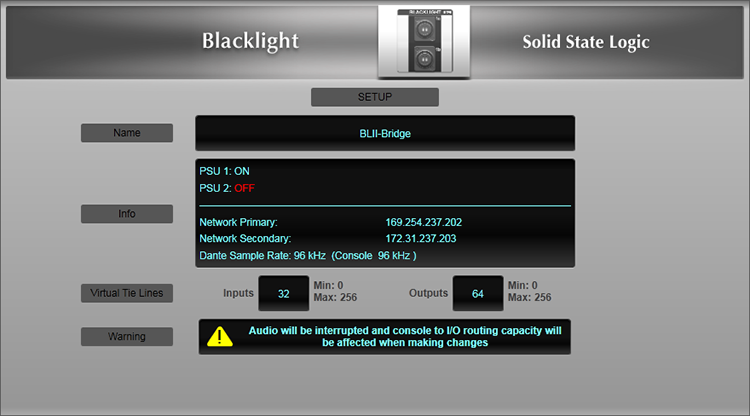
Up to 256 Virtual Tie Lines can be created at 96 kHz or 48 kHz.
BLII/X-Light Bridge Virtual Tie Lines appear in the Routing View under Bridge Virtual Tie Lines. The routing points are divided into groups of 32 channels for ease of navigation.
When dual domain routes are made, fewer Virtual Tie Lines can be created.
For example:
If the console and Dante Expander Module are at 96 kHz the maximum Dante routes possible is 32 (without a BLII/X-Light Bridge). If 2 dual domain routes are made, the remaining number of possible Dante routes becomes 30.
So no more than 30 Virtual Tie Lines can now be created.
Creating one Virtual Tie Line creates an input and an output simultaneously.
If the quantity of Virtual Tie Lines does not update after attempting to create more, you have reached the maximum quantity of Virtual Tie Lines possible.
This could be because
- You are trying to create more than 32 Virtual Tie Lines at 96 kHz or more than 64 at 48 kHz
- Or you already have some dual domain routes made, and therefore fewer Virtual Tie Lines can now be made.
- The more Virtual Tie Line routes that have been allocated, the fewer dual domain routes will be available for other Dante devices. Virtual Tie Lines are always allocated to the first n number of Dante inputs and outputs. Dual domain routes can be created from the remaining Dante inputs/outputs.
For example (at 96 kHz), if I make 10 Virtual Tie Lines, Dante inputs and outputs 1-10 will be assigned to Virtual Tie Lines.
All existing dual domain routes using these I/O points will be moved to different routing points. Only Dante inputs and outputs 11-32 are now available for dual domain routes.
The total quantity of dual domain routes and Virtual Tie Lines cannot exceed 32 channels at 96 kHz or 64 channels at 48 kHz.
The number of Dual Domain Routing inputs/outputs currently in use is displayed in a resource bar above the Configured Devices list in the Dante Configuration page.
 Important:
Changing the quantity of Virtual Tie Lines may cause a brief loss of audio.
Routing to/from Virtual Tie Lines
The Dante Virtual Tie Lines created will now appear in the routing view.
First, make a route on the console to/from Local Virtual Tie Lines or one of the routing points under Bridge Virtual Tie Lines for BLII/X-Light Bridge Virtual Tie Lines.
Then in Dante Controller, make the route between the console's Dante Expander Module/BLII Bridge/X-Light Bridge (as appropriate) and the other Dante device.
For example, let's say we want to route two channels from a computer running Dante Virtual Soundcard to the input of Channels 1 and 2 on the console using Virtual Tie Lines.
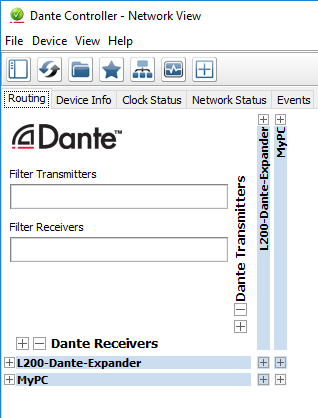
Ensure both the console's Dante Expander Module and the computer running Dante Virtual Soundcard are visible in Dante Controller and within the same subnet (names in black text).
Now create two Virtual Tie Lines on the console.
Go to MENU > Setup > I/O > Local/MADI Configuration and tap on the Dante Expander.
Double tap on the Virtual Tie Lines quantity and enter 2.

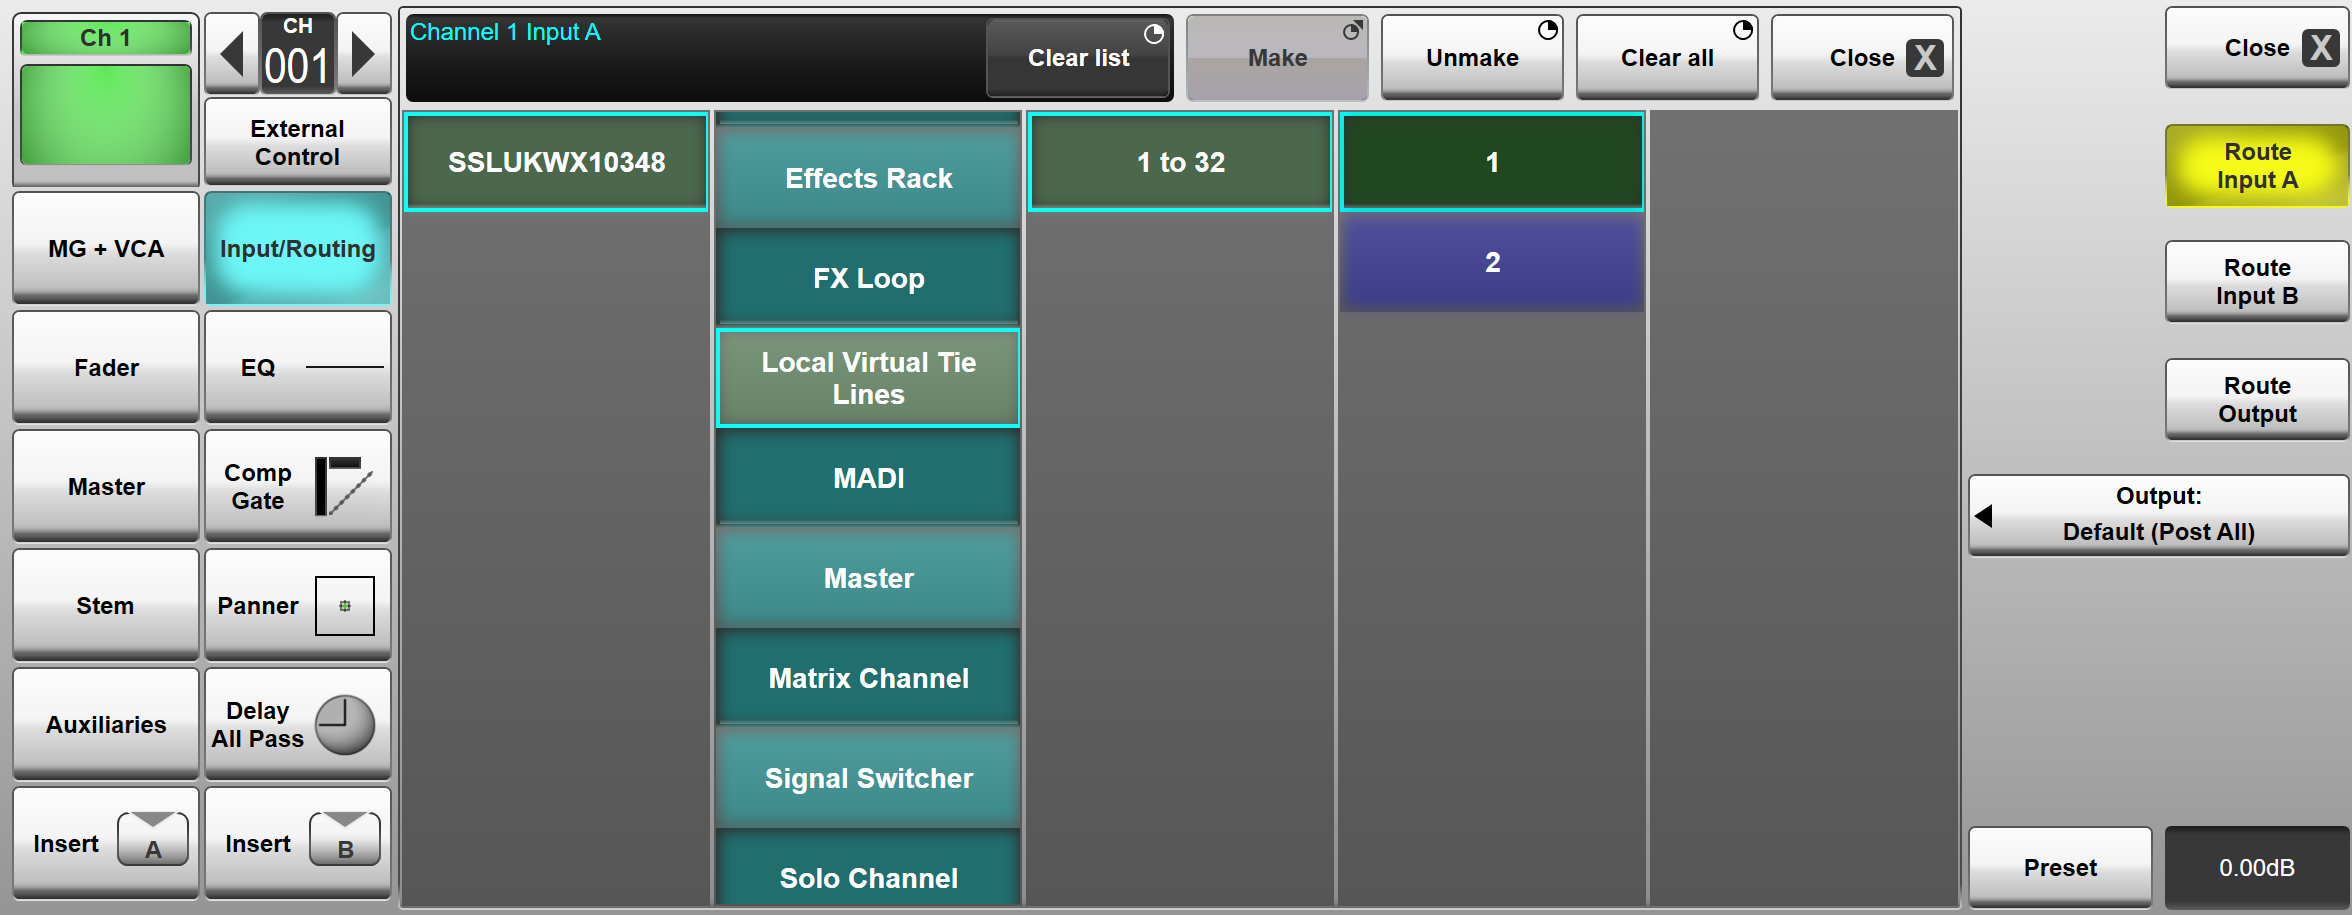
Now locate Channels 1 and 2 in the Channel View.
Double tap on Channel 1's eyeconix image and tap on Input/Routing.
Now tap on Route Input A.
Tap on the console (first routing point, usually starts with "LIVE"). Now tap on Local Virtual Tie Lines. Tap on 1 and tap Make.
The route will go green.
Now repeat this for Channel 2 and Dante Virtual Tie Line 2.
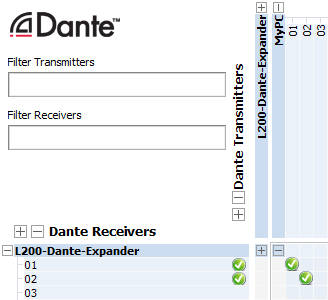
Back in Dante Controller, open the crosspoint matrix for the computer's transmit channels and the console's Dante Expander receive channels.
Create a route from the computers Dante Virtual Soundcard channels 1-2 to the console's Dante Expander channels 1-2 by clicking in those crosspoints.
Green check-marks will appear in those crosspoints.
System Set Minimum VTL Counts
System Set Minimum VTL Counts streamlines showfile routing for fixed installations by setting a system-defined minimum VTL count for each console's Dante interface. Even if a loaded showfile specifies a lower VTL count, the system enforces this minimum, preserving 'house set' connections that guest engineers cannot alter.
The minimum count is configured independently for the Live Dante Expander and each BLII expansion port via an XML file in the Config Files directory, contact SSL support for further details.
Useful Links:
Setting Up Dante
Dual Domain Routes and Configuring Dante Devices
Network I/O Stageboxes and Devices
BLII & X-Light Bridges
Local/MADI I/O Configuration
Installation Guide
Index and Glossary

